


注意
转到末尾 以下载完整的示例代码。
理解 requires_grad、retain_grad、叶子张量和非叶子张量#
作者: Justin Silver
本教程使用一个简单的示例,解释了 requires_grad、retain_grad、叶子张量和非叶子张量的细微差别。
在开始之前,请确保您理解 张量及其操作方法。对 autograd 的工作原理 的基本了解也将很有用。
设置#
首先,请确保已 安装 PyTorch,然后导入必要的库。
import torch
import torch.nn.functional as F
接下来,我们实例化一个简单的网络来关注梯度。这将是一个仿射层,后跟 ReLU 激活,最后是预测张量和标签张量之间的 MSE 损失。
请注意,参数(W 和 b)需要 requires_grad=True,以便 PyTorch 跟踪涉及这些张量的操作。我们将在未来的 部分 中更详细地讨论这一点。
# tensor setup
x = torch.ones(1, 3)                      # input with shape: (1, 3)
W = torch.ones(3, 2, requires_grad=True)  # weights with shape: (3, 2)
b = torch.ones(1, 2, requires_grad=True)  # bias with shape: (1, 2)
y = torch.ones(1, 2)                      # output with shape: (1, 2)

# forward pass
z = (x @ W) + b                           # pre-activation with shape: (1, 2)
y_pred = F.relu(z)                        # activation with shape: (1, 2)
loss = F.mse_loss(y_pred, y)              # scalar loss
叶子张量与非叶子张量#
在执行正向传播后,PyTorch autograd 已构建了一个 动态计算图,如下所示。这是一个 有向无环图 (DAG),它记录了输入张量(叶子节点)、对这些张量的所有后续操作以及中间/输出张量(非叶子节点)。该图使用微积分中的 链式法则,从图的根(输出)到叶子(输入)计算每个张量的梯度。
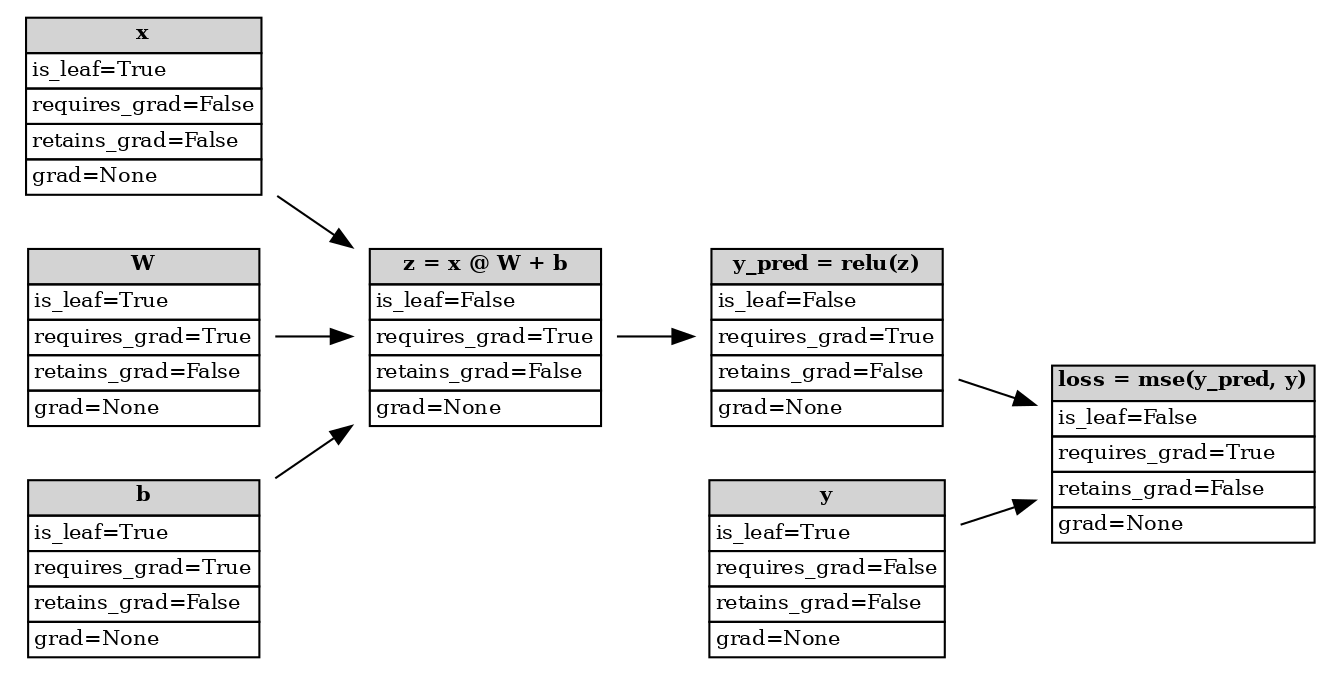
正向传播后的计算图#
PyTorch 将一个节点视为叶子,如果它不是至少一个具有 requires_grad=True 的输入张量运算的结果(例如 x、W、b 和 y),而所有其他节点则被视为非叶子(例如 z、y_pred 和 loss)。您可以通过检查张量的 is_leaf 属性以编程方式验证这一点。
x.is_leaf=True
z.is_leaf=False
叶子和非叶子之间的区别决定了在反向传播后,张量的梯度是否会存储在其 grad 属性中,从而可用于 梯度下降。我们将在 下一节 中更详细地介绍这一点。
现在让我们研究一下 PyTorch 如何在其计算图中计算和存储张量的梯度。
requires_grad#
为了构建可用于梯度计算的计算图,我们需要将 requires_grad=True 参数传递给张量构造函数。默认情况下,值为 False,因此 PyTorch 不会跟踪创建的任何张量的梯度。要验证这一点,请尝试不设置 requires_grad,重新运行正向传播,然后运行反向传播。您会看到
>>> loss.backward()
RuntimeError: element 0 of tensors does not require grad and does not have a grad_fn
此错误意味着 autograd 无法反向传播到任何叶子张量,因为 loss 未跟踪梯度。如果您需要更改此属性,可以通过在张量上调用 requires_grad_() 来实现(注意后面的 _)。
我们可以像上面使用 is_leaf 属性一样,对哪些节点需要梯度计算进行健全性检查。
x.requires_grad=False
W.requires_grad=True
z.requires_grad=True
需要记住的是,非叶子张量根据定义具有 requires_grad=True,否则反向传播将失败。如果张量是叶子,那么只有当用户明确设置时,它才具有 requires_grad=True。换句话说,如果张量的至少一个输入需要梯度,那么它也会需要梯度。
此规则有两个例外:
总之,requires_grad 告诉 autograd 需要为反向传播计算哪些张量的梯度。这不同于哪些张量的 grad 字段会被填充,这是下一节的主题。
retain_grad#
为了实际执行优化(例如 SGD、Adam 等),我们需要运行反向传播以便提取梯度。
backward() 调用会填充所有具有 requires_grad=True 的叶子张量的 grad 字段。 grad 是损失相对于我们正在探测的张量的梯度。在运行 backward() 之前,此属性设置为 None。
W.grad=tensor([[3., 3.],
[3., 3.],
[3., 3.]])
b.grad=tensor([[3., 3.]])
您可能想知道我们网络中的其他张量。让我们检查剩余的叶子节点。
x.grad=None
y.grad=None
这些张量的梯度未被填充,因为我们没有明确告诉 PyTorch 计算它们的梯度(requires_grad=False)。
现在让我们看一个中间非叶子节点。
print(f"{z.grad=}")
/var/lib/workspace/beginner_source/understanding_leaf_vs_nonleaf_tutorial.py:215: UserWarning:
The .grad attribute of a Tensor that is not a leaf Tensor is being accessed. Its .grad attribute won't be populated during autograd.backward(). If you indeed want the .grad field to be populated for a non-leaf Tensor, use .retain_grad() on the non-leaf Tensor. If you access the non-leaf Tensor by mistake, make sure you access the leaf Tensor instead. See github.com/pytorch/pytorch/pull/30531 for more information. (Triggered internally at /pytorch/build/aten/src/ATen/core/TensorBody.h:489.)
z.grad=None
PyTorch 返回 None 作为梯度,并警告我们正在访问非叶子节点的 grad 属性。虽然 autograd 必须计算中间梯度才能使反向传播正常工作,但它假定您之后不需要访问这些值。要更改此行为,我们可以对张量使用 retain_grad() 函数。这会告诉 autograd 引擎在调用 backward() 后填充该张量的 grad。
# we have to re-run the forward pass
z = (x @ W) + b
y_pred = F.relu(z)
loss = F.mse_loss(y_pred, y)
# tell PyTorch to store the gradients after backward()
z.retain_grad()
y_pred.retain_grad()
loss.retain_grad()
# have to zero out gradients otherwise they would accumulate
W.grad = None
b.grad = None
# backpropagation
loss.backward()
# print gradients for all tensors that have requires_grad=True
print(f"{W.grad=}")
print(f"{b.grad=}")
print(f"{z.grad=}")
print(f"{y_pred.grad=}")
print(f"{loss.grad=}")
W.grad=tensor([[3., 3.],
        [3., 3.],
        [3., 3.]])
b.grad=tensor([[3., 3.]])
z.grad=tensor([[3., 3.]])
y_pred.grad=tensor([[3., 3.]])
loss.grad=tensor(1.)
我们获得的 W.grad 结果与之前相同。另外请注意,由于损失是标量,损失相对于其自身的梯度就是 1.0。
如果我们查看计算图现在的状态,我们会发现中间张量的 retains_grad 属性已发生更改。按约定,此属性将打印 False 对于任何叶子节点,即使它需要其梯度。
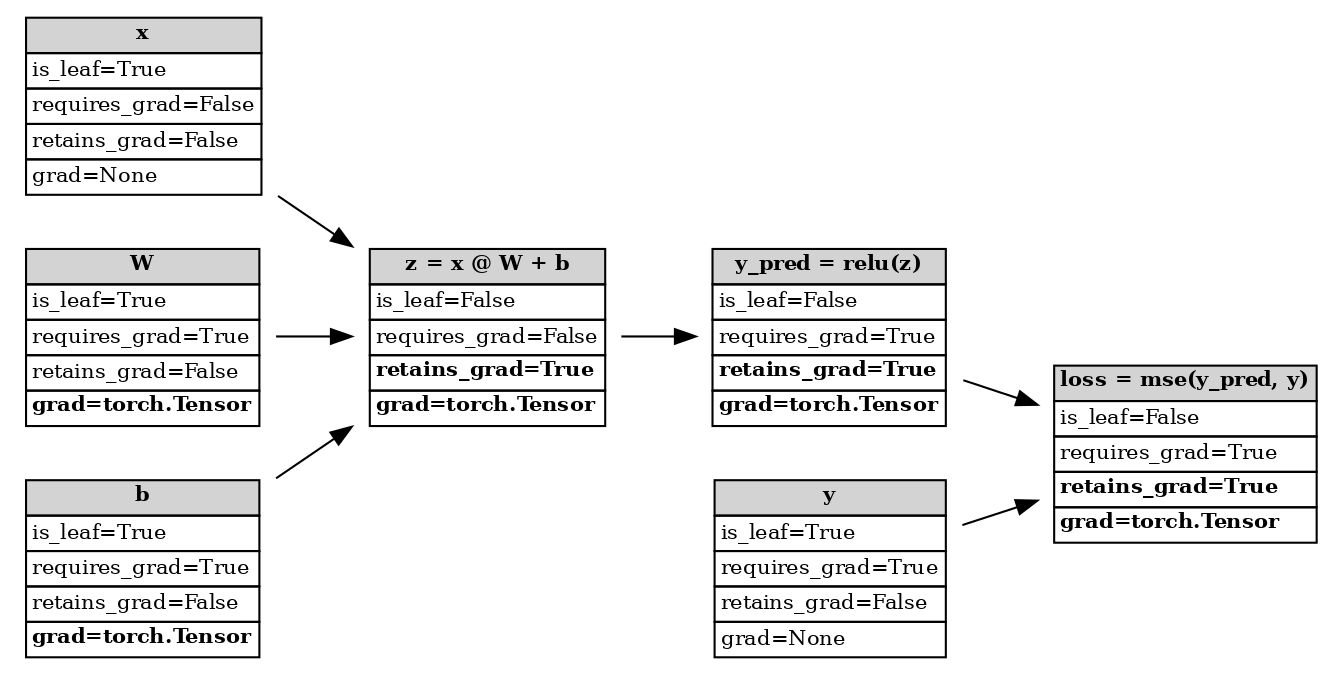
反向传播后的计算图#
如果您对非叶子节点调用 retain_grad(),则不会产生任何效果。如果我们对具有 requires_grad=False 的节点调用 retain_grad(),PyTorch 实际上会抛出错误,因为它无法存储梯度(如果它从未被计算过)。
>>> x.retain_grad()
RuntimeError: can't retain_grad on Tensor that has requires_grad=False
摘要表#
使用 retain_grad() 和 retains_grad 仅对非叶子节点有意义,因为对于具有 requires_grad=True 的叶子张量,grad 属性已经填充。默认情况下,这些非叶子节点在反向传播后不保留(存储)其梯度。我们可以通过重新运行正向传播,告诉 PyTorch 存储梯度,然后执行反向传播来更改此行为。
下表可用作参考,总结了上述讨论。以下场景是 PyTorch 张量唯一有效的场景。
|
|
|
|
|
|---|---|---|---|---|
|
|
|
将 |
无操作 |
|
|
|
将 |
无操作 |
|
|
|
无操作 |
将 |
|
|
|
无操作 |
无操作 |
结论#
在本教程中,我们涵盖了 PyTorch 何时以及如何为叶子和非叶子张量计算梯度。通过使用 retain_grad,我们可以访问 autograd 计算图中中间张量的梯度。
如果您想了解更多关于 PyTorch 的 autograd 系统如何工作的信息,请访问下面的 参考资料。如果您对此教程有任何反馈(改进、拼写错误修复等),请使用 PyTorch 论坛 和/或 issue 跟踪器 联系我们。
参考资料#
脚本总运行时间: (0 分钟 0.321 秒)