如何使用 DistributedDataParallel(DDP)
本文档介绍了如何在 xla 中使用 torch.nn.parallel.DistributedDataParallel,并进一步描述了它与原生 xla 数据并行方法的区别。您可以在此处找到一个最小可运行示例。
背景/动机
客户长期以来一直要求能够将 PyTorch 的 DistributedDataParallel API 与 xla 一起使用。我们现在将其作为一个实验性功能启用。
如何使用 DistributedDataParallel
对于那些从 PyTorch eager 模式切换到 XLA 的用户,以下是将 eager DDP 模型转换为 XLA 模型所需的所有更改。我们假设您已经知道如何在单个设备上使用 XLA。
导入 xla 特定的分布式包
import torch_xla
import torch_xla.runtime as xr
import torch_xla.distributed.xla_backend
初始化 xla 进程组,类似于其他进程组(如 nccl 和 gloo)。
dist.init_process_group("xla", rank=rank, world_size=world_size)
如果需要,使用 xla 特定的 API 来获取 rank 和 world_size。
new_rank = xr.global_ordinal()
world_size = xr.world_size()
使用 DDP 包装模型。
ddp_model = DDP(model, gradient_as_bucket_view=True)
最后,使用 xla 特定的启动器启动您的模型。
torch_xla.launch(demo_fn)
这里我们将所有内容整合在一起(示例实际上取自DDP 教程)。您的编码方式与 eager 体验非常相似。只需在单个设备上添加 xla 特定的修改,以及对脚本进行的上述五项更改。
import os
import sys
import tempfile
import torch
import torch.distributed as dist
import torch.nn as nn
import torch.optim as optim

from torch.nn.parallel import DistributedDataParallel as DDP

# additional imports for xla
import torch_xla
import torch_xla.core.xla_model as xm
import torch_xla.runtime as xr
import torch_xla.distributed.xla_backend

def setup(rank, world_size):
    os.environ['PJRT_DEVICE'] = 'TPU'

    # initialize the xla process group
    dist.init_process_group("xla", rank=rank, world_size=world_size)

def cleanup():
    dist.destroy_process_group()

class ToyModel(nn.Module):
    def __init__(self):
        super(ToyModel, self).__init__()
        self.net1 = nn.Linear(10, 1000000)
        self.relu = nn.ReLU()
        self.net2 = nn.Linear(1000000, 5)

    def forward(self, x):
        return self.net2(self.relu(self.net1(x)))

def demo_basic(rank):
    # xla specific APIs to get rank, world_size.
    new_rank = xr.global_ordinal()
    assert new_rank == rank
    world_size = xr.world_size()

    print(f"Running basic DDP example on rank {rank}.")
    setup(rank, world_size)

    # create model and move it to XLA device
    device = xm.xla_device()
    model = ToyModel().to(device)
    ddp_model = DDP(model, gradient_as_bucket_view=True)

    loss_fn = nn.MSELoss()
    optimizer = optim.SGD(ddp_model.parameters(), lr=0.001)

    optimizer.zero_grad()
    outputs = ddp_model(torch.randn(20, 10).to(device))
    labels = torch.randn(20, 5).to(device)
    loss_fn(outputs, labels).backward()
    optimizer.step()
    # xla specific API to execute the graph
    xm.mark_step()

    cleanup()


def run_demo(demo_fn):
    # xla specific launcher
    torch_xla.launch(demo_fn)

if __name__ == "__main__":
    run_demo(demo_basic)
基准测试
Resnet50 使用虚假数据
以下结果是在 TPU VM V3-8 环境中使用 ToT PyTorch 和 PyTorch/XLA 运行命令收集的。
python test/test_train_mp_imagenet.py --fake_data --model=resnet50 --num_epochs=1
统计指标是使用此拉取请求中的脚本生成的。速率单位是每秒图像数。
| 类型 | 平均值 | 中位数 | 90% 分位数 | 标准差 | CV |
|---|---|---|---|---|---|
| xm.optimizer_step | 418.54 | 419.22 | 430.40 | 9.76 | 0.02 |
| DDP | 395.97 | 395.54 | 407.13 | 7.60 | 0.02 |
我们的原生分布式数据并行方法与 DistributedDataParallel 包装器之间的性能差异为:1 - 395.97 / 418.54 = 5.39%。考虑到 DDP 包装器在跟踪 DDP 运行时引入了额外的开销,这个结果是合理的。
MNIST 使用虚假数据
以下结果是在 TPU VM V3-8 环境中使用 ToT PyTorch 和 PyTorch/XLA 运行命令:python test/test_train_mp_mnist.py --fake_data 收集的。统计指标是使用此拉取请求中的脚本生成的。速率单位是每秒图像数。
| 类型 | 平均值 | 中位数 | 90% 分位数 | 标准差 | CV |
|---|---|---|---|---|---|
| xm.optimizer_step | 17864.19 | 20108.96 | 24351.74 | 5866.83 | 0.33 |
| DDP | 10701.39 | 11770.00 | 14313.78 | 3102.92 | 0.29 |
我们的原生分布式数据并行方法与 DistributedDataParallel 包装器之间的性能差异为:1 - 14313.78 / 24351.74 = 41.22%。由于数据集较小,并且前几轮受数据加载的严重影响,我们在这里比较 90% 分位数。这种减速非常明显,但考虑到模型很小,这是可以理解的。额外的 DDP 运行时跟踪开销难以摊销。
MNIST 使用真实数据
以下结果是在 TPU VM V3-8 环境中使用 ToT PyTorch 和 PyTorch/XLA 运行命令收集的。
python test/test_train_mp_mnist.py --logdir mnist/ o.
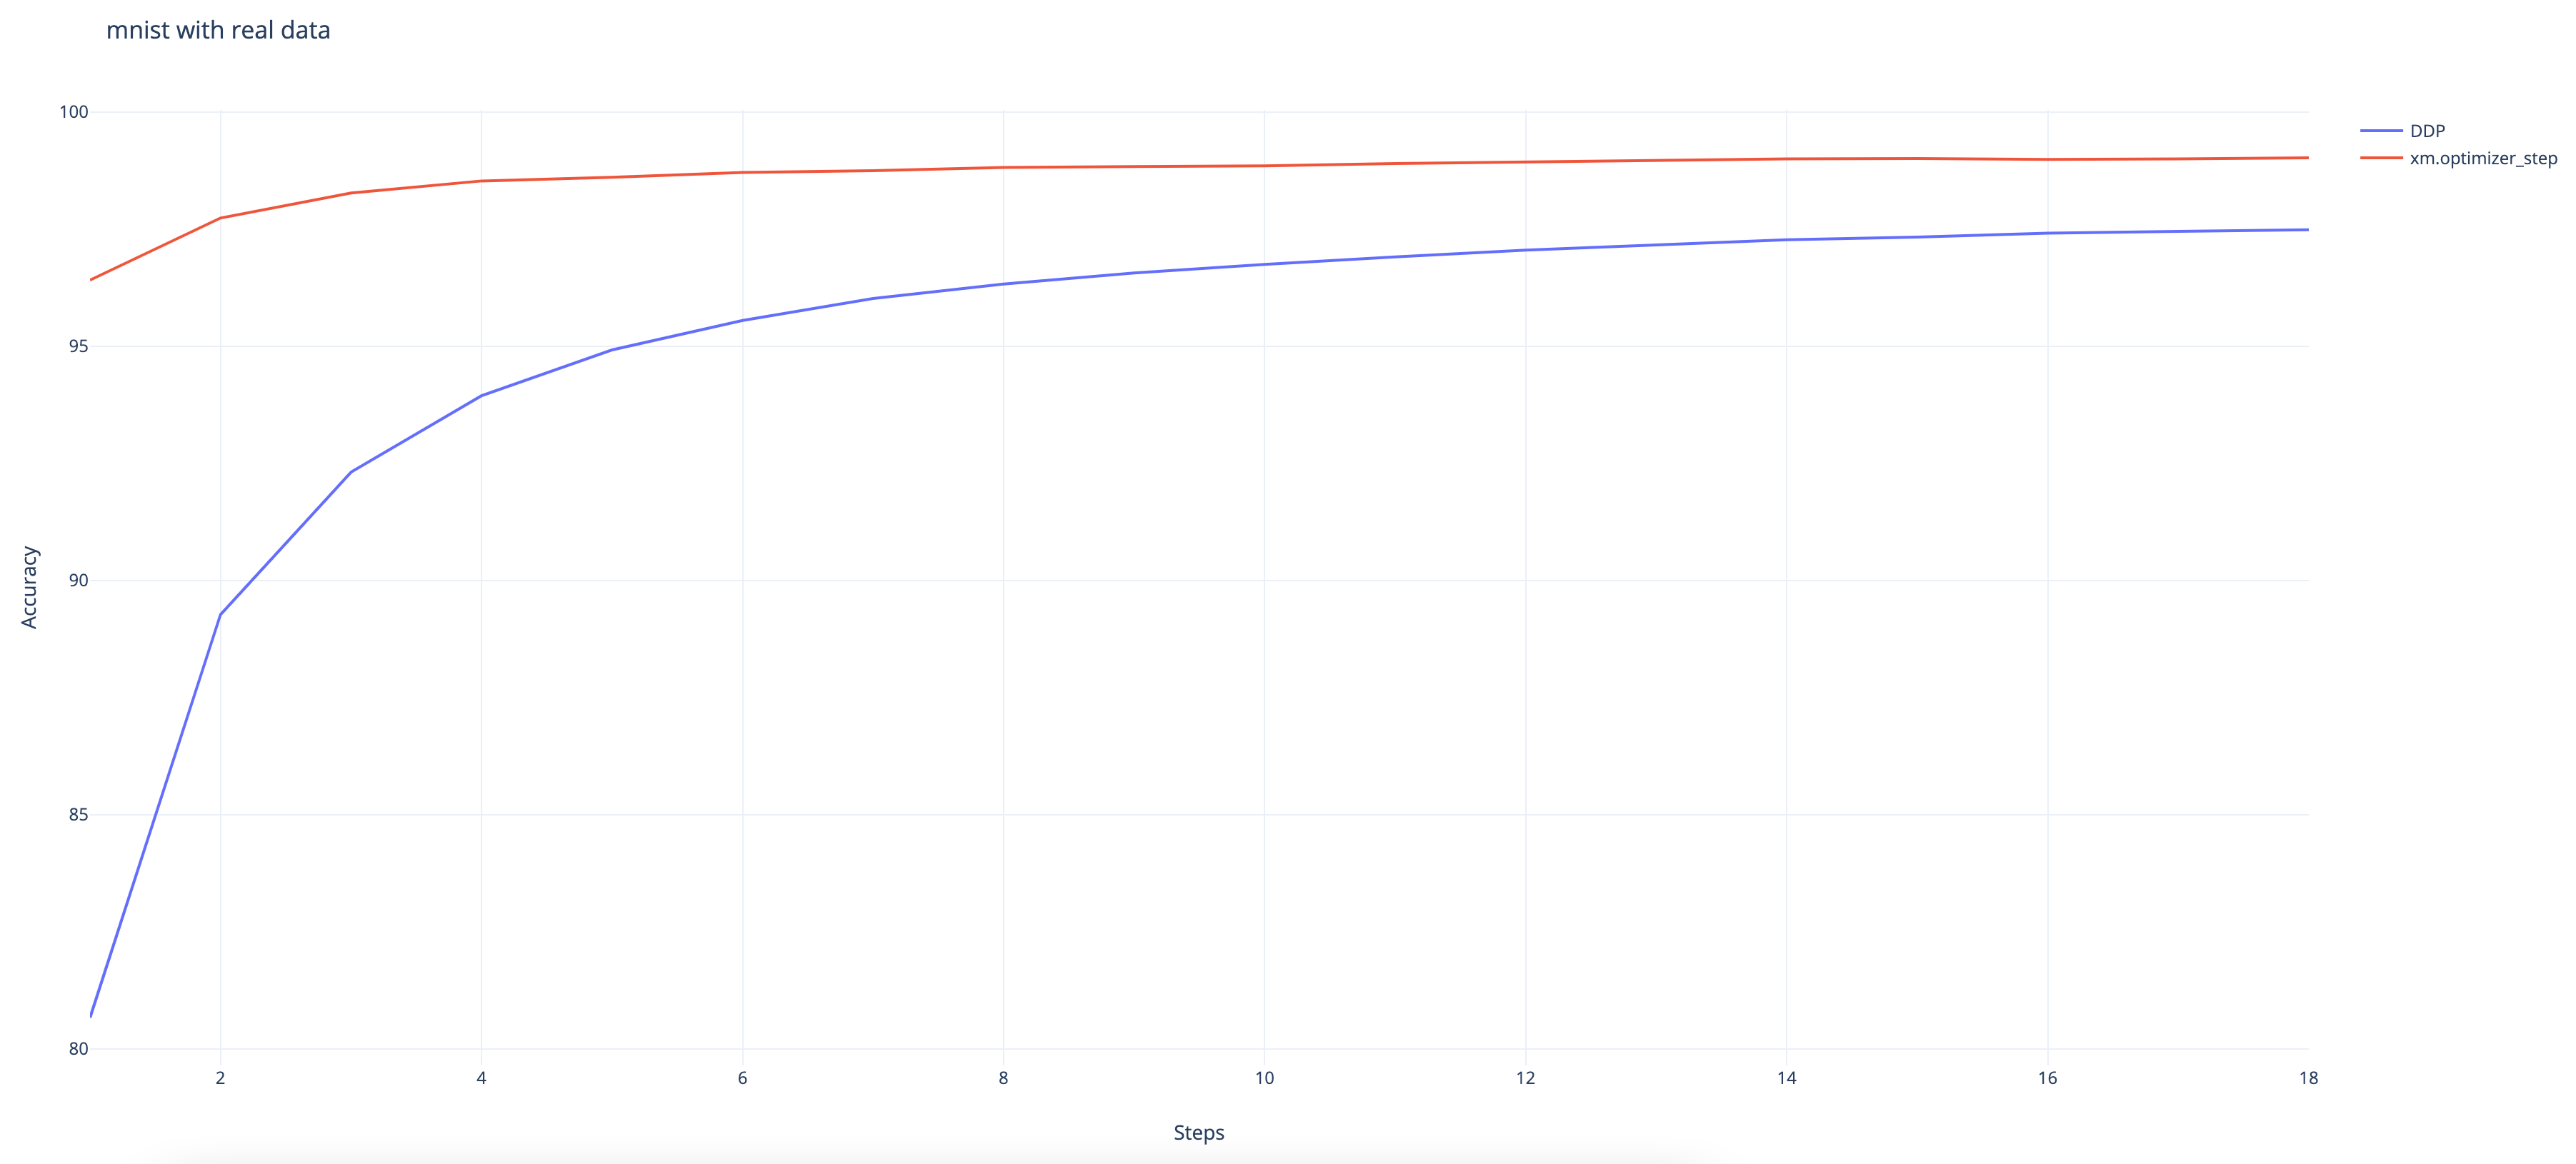
我们可以观察到 DDP 包装器的收敛速度比原生 XLA 方法慢,尽管它在最后仍达到了 97.48% 的高准确率。(原生方法达到了 99%)。
免责声明
此功能仍处于实验阶段,并且正在积极开发中。请谨慎使用,并随时向xla github 仓库提交任何 bug。对于那些对原生 xla 数据并行方法感兴趣的人,这里是教程。
以下是一些正在调查中的已知问题:* 在与 torch.utils.data.DataLoader 结合使用时存在一些问题。使用真实数据的 test_train_mp_mnist.py 在退出前崩溃。
