(第二部分) 使用 QAT、QLoRA 和 float8 进行微调
TorchAO 通过利用我们集成到合作伙伴框架中的量化和稀疏技术,提供端到端的预训练、微调和推理模型优化流程。这是展示此端到端流程的 3 个教程中的第 2 部分,重点关注微调步骤。
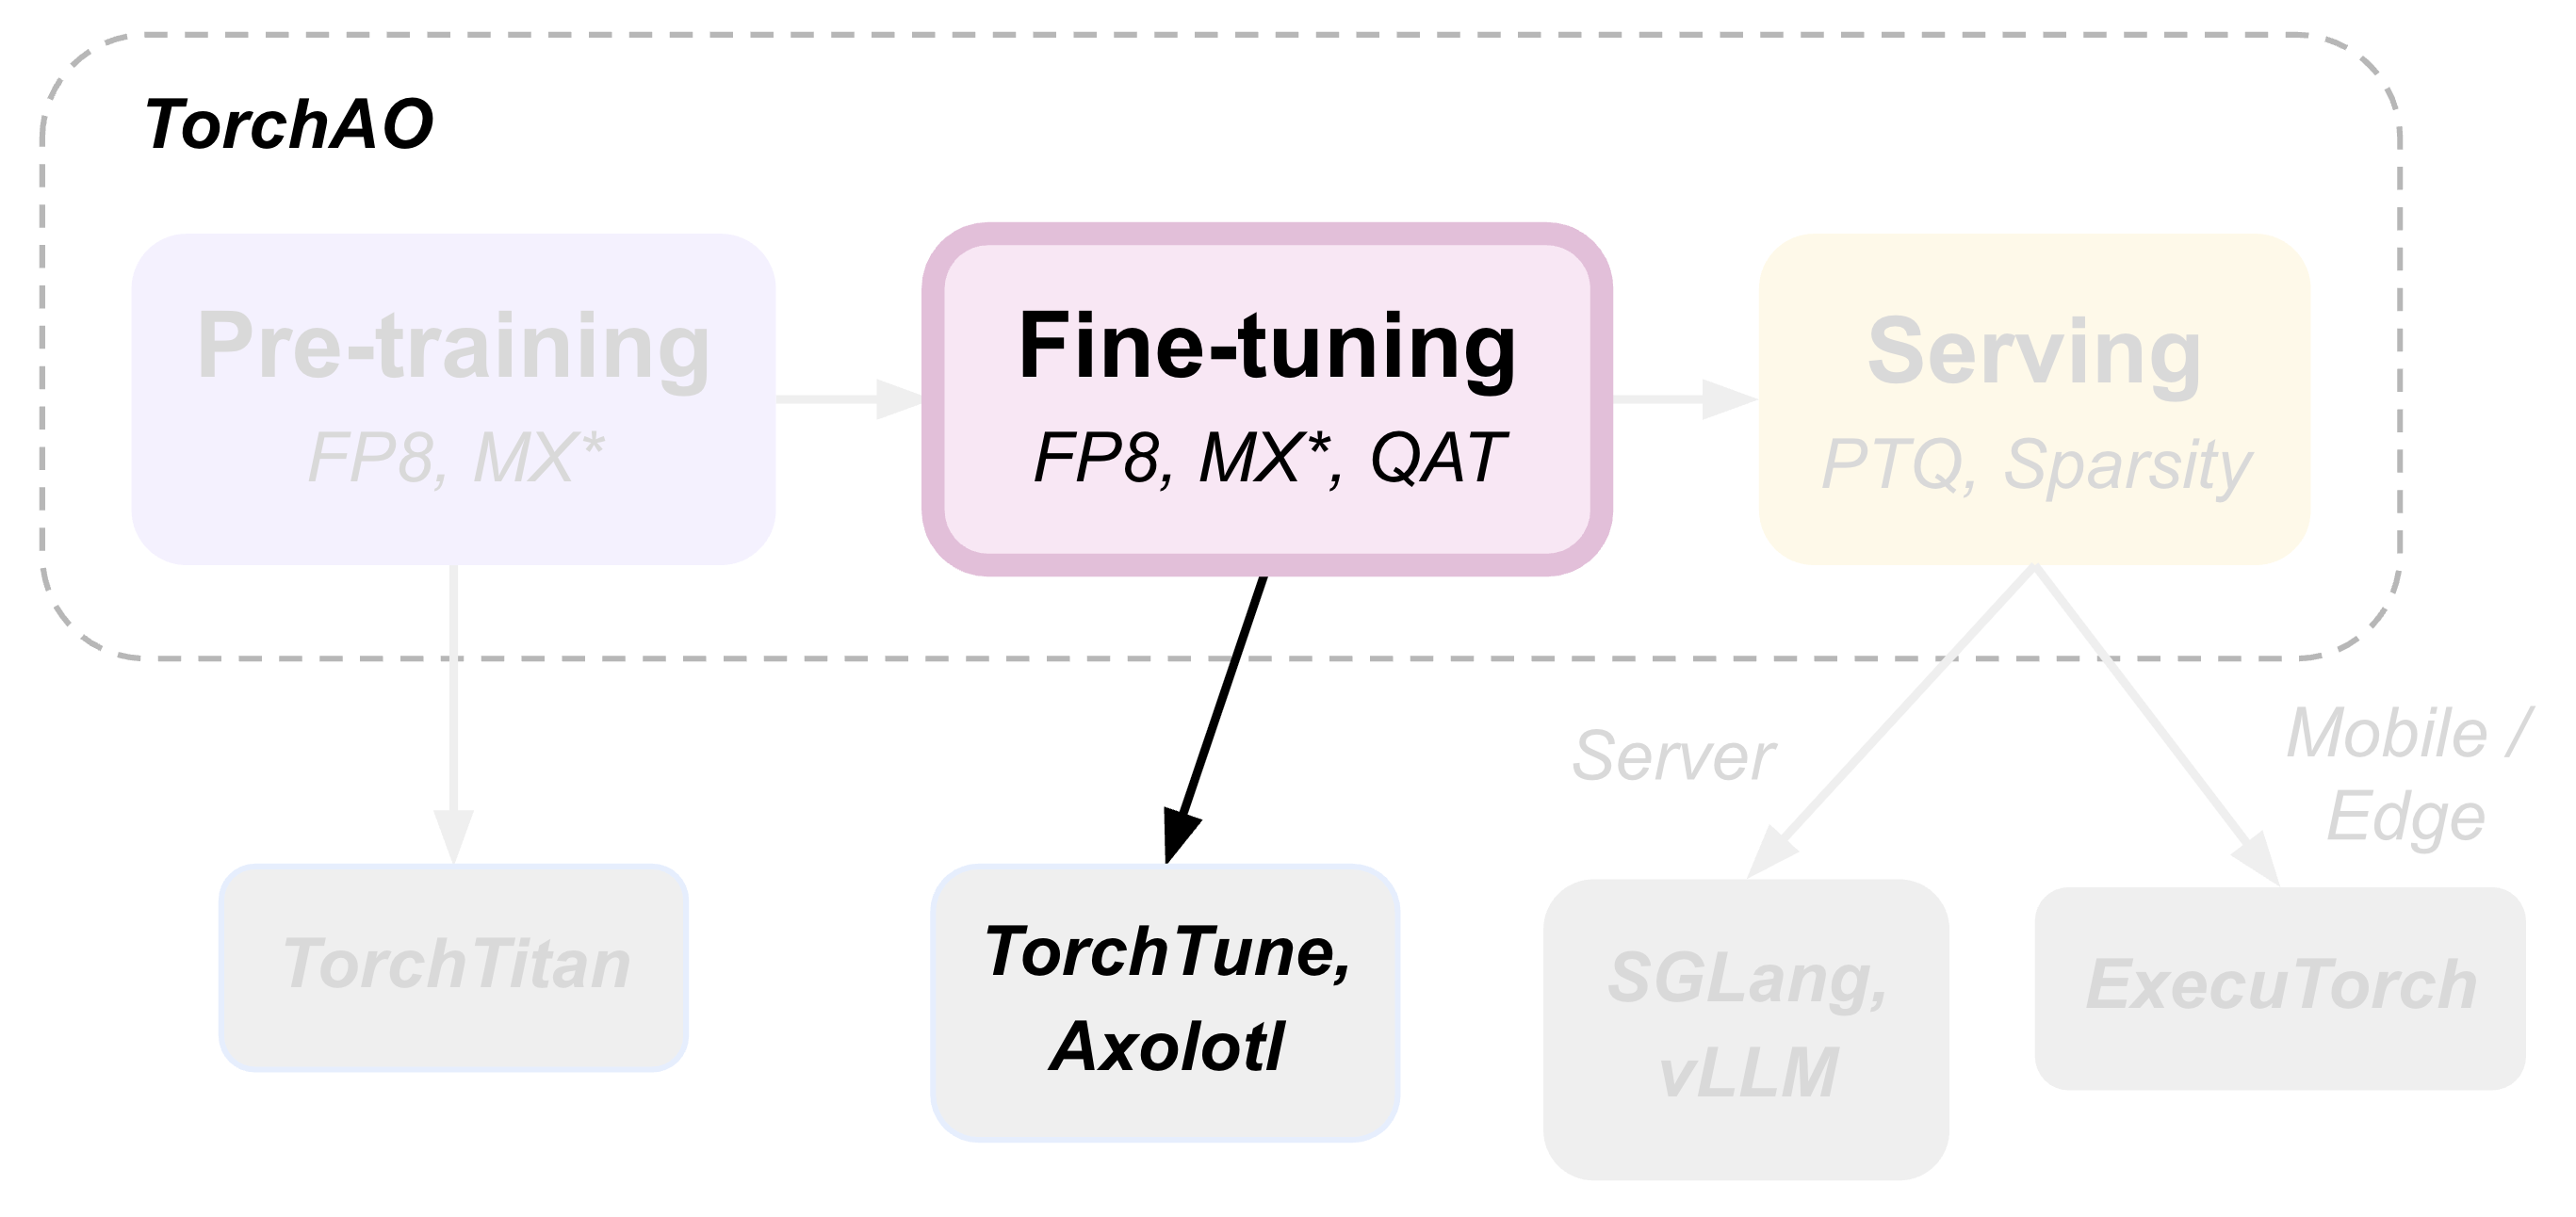
微调是将预训练模型适应更领域特定数据的重要步骤。在本教程中,我们将演示可以在微调期间应用于模型的 3 种模型优化技术:
1. 量化感知训练 (QAT),用于在微调期间使模型适应量化数值,目标是在最终量化模型(例如,在推理步骤中)时减轻量化引起的性能下降。有关更多详细信息,请参阅我们的博客和README!
2. 量化低秩适配 (QLoRA),通过引入小的、可训练的低秩矩阵并冻结原始预训练检查点,从而减少微调的资源需求,这是一种参数高效微调 (PEFT)。有关更多详细信息,请参阅原始论文。
3. Float8 量化微调,通过动态地将高精度权重和激活量化为 float8 来加速微调,类似于float8 预训练。
量化感知训练 (QAT)
量化感知训练 (QAT) 的目标是在训练或微调期间使模型适应量化数值,从而减轻模型在最终量化时(可能是在微调后的推理步骤中)不可避免的量化性能下降。TorchAO 的 QAT 支持已成功用于最近发布的Llama-3.2 量化 1B/3B 和LlamaGuard-3-8B 模型,以提高量化模型的质量。
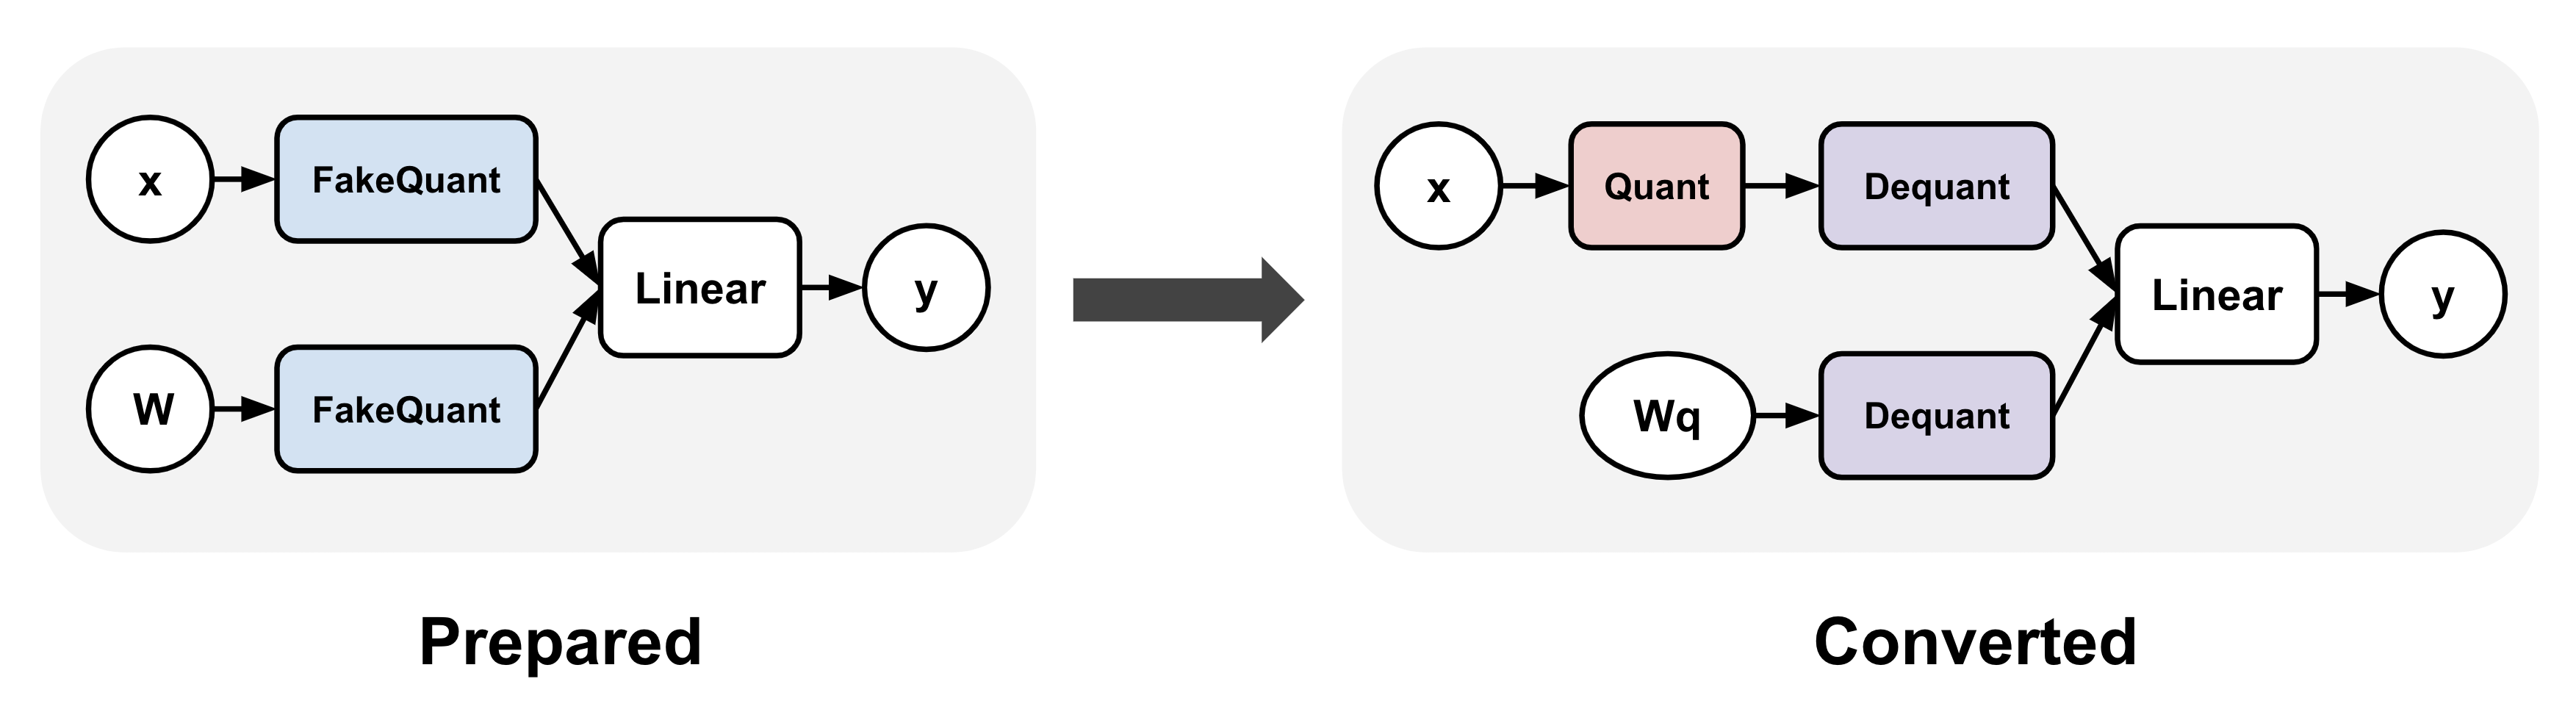
TorchAO 的 QAT 支持涉及两个独立的步骤:准备 (prepare) 和转换 (convert)。准备步骤在训练期间“虚假”量化激活和/或权重,这意味着高精度值(例如 bf16)被映射到其对应的量化值,但实际上并未将其转换为目标较低精度的数据类型(例如 int4)。转换步骤在训练后应用,它用执行数据类型转换的“真实”量化替换模型中的“虚假”量化操作。
有多种选项可用于 TorchAO 的 QAT 进行微调:
选项 1:TorchTune QAT 集成
TorchAO 的 QAT 支持已集成到 TorchTune 的分布式微调实践案例中。您可以使用以下命令替换该命令,该命令执行无 QAT 的完全分布式微调:
# Regular fine-tuning without QAT
tune run --nnodes 1 --nproc_per_node 4 full_finetune_distributed --config llama3_2/3B_full batch_size=16
用户可以改用以下等效命令。请注意,指定量化器是可选的:
# Fine-tuning with QAT, by default:
#   activations are fake quantized to asymmetric per token int8
#   weights are fake quantized to symmetric per group int4
#   configurable through "quantizer._component_" in the command
tune run --nnodes 1 --nproc_per_node 4 qat_distributed --config llama3_2/3B_qat_full batch_size=16
微调后,用户可以按如下方式量化和评估结果模型。无论微调过程中是否使用了 QAT,这都是相同的:
# Quantize model weights to int4
tune run quantize --config quantization \
    model._component_=torchtune.models.llama3_2.llama3_2_3b \
    checkpointer._component_=torchtune.training.FullModelHFCheckpointer \
    'checkpointer.checkpoint_files=[model-00001-of-00002.safetensors,model-00002-of-00002.safetensors]' \
    checkpointer.model_type=LLAMA3 \
    quantizer._component_=torchtune.training.quantization.Int8DynActInt4WeightQuantizer \
    quantizer.groupsize=32

# Evaluate the int4 model on hellaswag and wikitext
tune run eleuther_eval --config eleuther_evaluation \
    batch_size=1 \
    'tasks=[hellaswag, wikitext]' \
    model._component_=torchtune.models.llama3_2.llama3_2_3b \
    checkpointer._component_=torchtune.training.FullModelTorchTuneCheckpointer \
    'checkpointer.checkpoint_files=[model-00001-of-00002-8da4w.ckpt]' \
    checkpointer.model_type=LLAMA3 \
    tokenizer._component_=torchtune.models.llama3.llama3_tokenizer \
    tokenizer.path=/tmp/Meta-Llama-3-8B-Instruct/original/tokenizer.model \
    quantizer._component_=torchtune.training.quantization.Int8DynActInt4WeightQuantizer \
    quantizer.groupsize=32
微调后,这应该会打印出以下内容:
|  Tasks  |Version|Filter|n-shot| Metric |   |Value |   |Stderr|
|---------|------:|------|------|--------|---|-----:|---|-----:|
|hellaswag|      1|none  |None  |acc     |↑  |0.5021|±  |0.0050|
|         |       |none  |None  |acc_norm|↑  |0.6797|±  |0.0047|

| Tasks  |Version|Filter|n-shot|    Metric     |   | Value |   |Stderr|
|--------|------:|------|------|---------------|---|------:|---|------|
|wikitext|      2|none  |None  |bits_per_byte  |↓  | 0.6965|±  |   N/A|
|        |       |none  |None  |byte_perplexity|↓  | 1.6206|±  |   N/A|
|        |       |none  |None  |word_perplexity|↓  |13.2199|±  |   N/A|
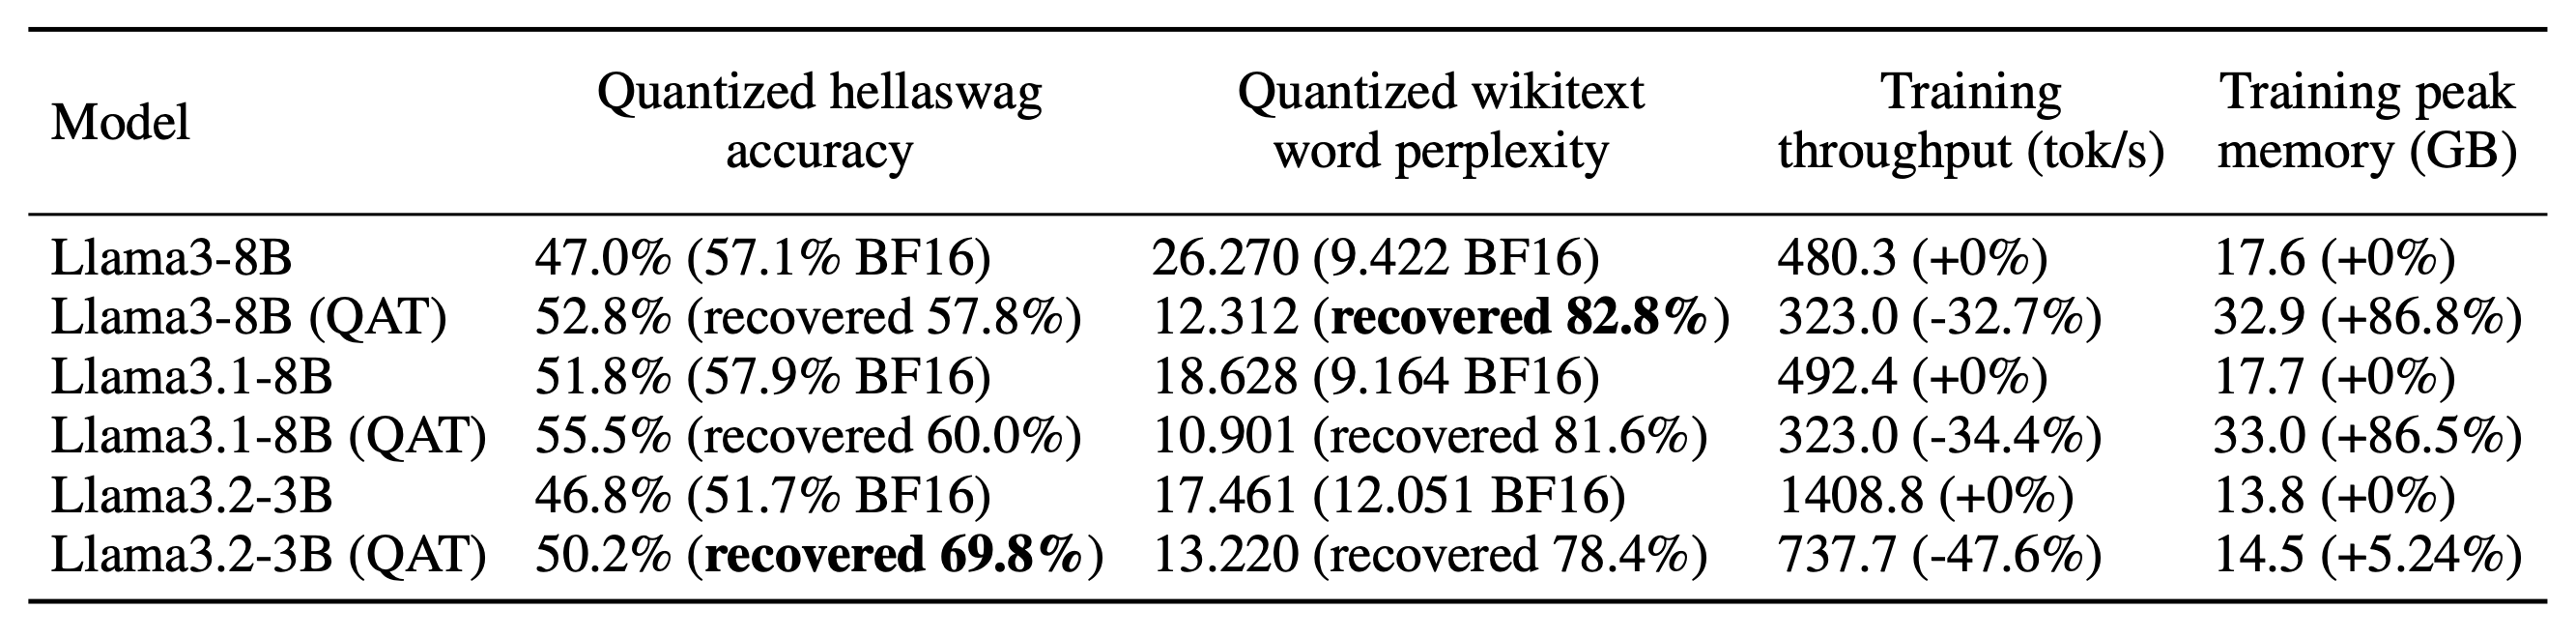
您可以比较有 QAT 和无 QAT 的这些值,看看 QAT 在减轻量化性能下降方面有多大帮助!例如,在使用OpenAssistant Conversations (OASST1) 数据集微调 Llama-3.2-3B 时,我们发现量化模型使用 QAT 时的准确率比不使用 QAT 时高 3.4%,挽回了量化引起的总体准确率下降的 69.8%。
除了上述示例中的标准 QAT 外,TorchAO 的 QAT 还可以与 LoRA 结合使用,可实现1.89 倍的训练速度提升,并降低 36.1% 的内存使用量。这在 TorchTune 的QAT + LoRA 微调实践案例中实现,可以使用以下命令运行:
# Fine-tuning with QAT + LoRA
tune run --nnodes 1 --nproc_per_node 4 qat_lora_finetune_distributed --config llama3_2/3B_qat_lora batch_size=16
有关 QAT 在 TorchTune 中设置方式的更多详细信息,请参阅此教程。
选项 2:Axolotl QAT 集成
Axolotl 最近还添加了一个 QAT 微调实践案例,该案例利用了 TorchAO 的 QAT 支持。要开始使用,请尝试使用以下命令通过 QAT 微调 Llama-3.2-3B:
axolotl train examples/llama-3/3b-qat-fsdp2.yaml
# once training is complete, perform the quantization step

axolotl quantize examples/llama-3/3b-qat-fsdp2.yaml
# you should now have a quantized model saved in ./outputs/qat_out/quatized
有关详细信息,请参阅Axolotl QAT 文档。
选项 3:TorchAO QAT API
如果您更喜欢使用不同的训练框架或自己的自定义训练循环,可以直接调用 TorchAO 的 QAT API 在微调之前转换模型。这些 API 是 TorchTune 和 Axolotl QAT 集成在后台调用的。
在此示例中,我们将在单个 GPU 上微调 Llama3 的迷你版本:
import torch
from torchtune.models.llama3 import llama3

# Set up a smaller version of llama3 to fit in a single A100 GPU
# For smaller GPUs, adjust the model attributes accordingly
def get_model():
    return llama3(
        vocab_size=4096,
        num_layers=16,
        num_heads=16,
        num_kv_heads=4,
        embed_dim=2048,
        max_seq_len=2048,
    ).cuda()

# Example training loop
def train_loop(m: torch.nn.Module):
    optimizer = torch.optim.SGD(m.parameters(), lr=0.001, momentum=0.9, weight_decay=1e-5)
    loss_fn = torch.nn.CrossEntropyLoss()
    for i in range(10):
        example = torch.randint(0, 4096, (2, 16)).cuda()
        target = torch.randn((2, 16, 4096)).cuda()
        output = m(example)
        loss = loss_fn(output, target)
        loss.backward()
        optimizer.step()
        optimizer.zero_grad()
接下来,运行准备步骤,该步骤虚假量化模型。在此示例中,我们将 int8 每 token 动态激活和 int4 每组对称权重作为我们的量化方案。请注意,尽管我们的目标是较低的整数精度,但由于我们实际上并未转换虚假量化值,因此训练仍以较高的浮点精度 (float32) 执行算术运算。
from torchao.quantization import quantize_, Int8DynamicActivationInt4WeightConfig
from torchao.quantization.qat import QATConfig

model = get_model()

# prepare: swap `torch.nn.Linear` -> `FakeQuantizedLinear`
base_config = Int8DynamicActivationInt4WeightConfig(group_size=32)
quantize_(model, QATConfig(base_config, step="prepare"))

# fine-tune
train_loop(model)
微调后,我们得到一个原始高精度的模型。此微调模型与原始模型的结构完全相同。唯一的区别是 QAT 微调模型具有更能适应量化的权重,这将在稍后的推理中有所帮助。下一步是实际量化模型:
from torchao.quantization import Int8DynamicActivationInt4WeightConfig

# convert: swap `FakeQuantizedLinear` -> `torch.nn.Linear`, then quantize using `base_config`
quantize_(model, QATConfig(base_config, step="convert"))

# inference or generate
现在我们的模型已准备好进行推理,并且通常会比在微调期间未应用准备步骤(虚假量化)的情况具有更高的量化精度。
有关使用 TorchAO QAT API 的完整详细信息,请参阅QAT README。
替代旧版 API
上述 quantize_ API 是使用 TorchAO QAT 的推荐流程。我们也提供了一个替代的旧版“quantizer”API,用于特定的量化方案,但与上面的示例不同,这些 API 不可自定义。
from torchao.quantization.qat import Int8DynActInt4WeightQATQuantizer
qat_quantizer = Int8DynActInt4WeightQATQuantizer(group_size=32)

# prepare: insert fake quantization ops
# swaps `torch.nn.Linear` with `Int8DynActInt4WeightQATLinear`
model = qat_quantizer.prepare(model)

# train
train_loop(model)

# convert: transform fake quantization ops into actual quantized ops
# swaps `Int8DynActInt4WeightQATLinear` with `Int8DynActInt4WeightLinear`
model = qat_quantizer.convert(model)
量化低秩适配 (QLoRA)
低秩适配 (LoRA) 指的是冻结原始模型,而是训练一组新的“适配器”参数,这些参数占原始参数的一小部分,从而显著减少训练期间的内存占用。QLoRA 是 LoRA 的扩展,它还额外将冻结的原始模型参数量化为 4 位,从而进一步减少内存占用。
TorchAO 提供了原始QLoRA 论文中提出的 NF4 数据类型的实现。此实现通过 NF4Tensor 将 NF4 表示为张量子类,该子类可与其他 PyTorch 功能(如 torch.compile 和 FSDP2)干净地组合。用户可以通过调用 torchao.dtypes.to_nf4 简单地将高精度张量转换为 NF4。例如:
class FrozenNF4Linear(nn.Linear):
    def __init__(
        self,
        in_dim: int,
        out_dim: int,
        bias: bool = False,
        device: Optional[torch.device] = None,
        dtype: Optional[torch.dtype] = None,
        **quantization_kwargs,
    ):
        super().__init__(in_dim, out_dim, bias=bias, device=device, dtype=dtype)
        # No need to train these in QLoRA
        self.weight.requires_grad_(False)
        if self.bias is not None:
            self.bias.requires_grad_(False)
        nf4_weight = to_nf4(self.weight, **quantization_kwargs)
        self.weight = torch.nn.Parameter(nf4_weight, requires_grad=False)
QLoRA 不一定非要与 NF4 一起使用,尽管 NF4 已被证明与 bf16 基线相比具有竞争力,同时显著减少了训练所需的内存。此技术还可以与其他低位数据类型(如常规 INT4 或针对 Blackwell GPU 的较新 MXFP4 或 NVFP4)结合使用,以在不同的权衡中获得相似的内存优势。
选项 1:TorchTune 集成
TorchTune 通过其 LoRALinear 实现,将 NF4Tensor 纳入其 QLoRA 微调实践案例。您还可以通过运行以下命令来尝试,或参阅其QLoRA 教程了解更多详细信息。
tune run lora_finetune_single_device --config llama3_2/3B_qlora_single_device.yaml
选项 2:HuggingFace PEFT 集成
HuggingFace PEFT 还拥有一个利用 TorchAO 的 INT8 量化的有限版本的 QLoRA,尽管尚不支持 INT4 或 NF4。用户可以通过按如下方式准备模型来调用此功能。有关详细信息,请参阅此教程。
from peft import LoraConfig, get_peft_model
from transformers import AutoModelForCausalLM, TorchAoConfig
from torchao.quantization import Int8WeightOnlyConfig

base_model = AutoModelForCausalLM.from_pretrained(
    "meta-llama/Llama-3.2-1B",
    quantization_config=TorchAoConfig(Int8WeightOnlyConfig()),
)
peft_config = LoraConfig()
model = get_peft_model(base_model, peft_config)
Float8 量化微调
与预训练类似,我们也可以在微调中使用 float8 来提高训练吞吐量,而不会降低准确率或增加内存使用量。Float8 训练已集成到 TorchTune 的分布式全模型微调实践案例中,利用了与我们与 TorchTitan 集成相同的 API。用户可以通过运行以下命令来调用此微调实践案例:
tune run --nnodes 1 --nproc_per_node 4 full_finetune_distributed --config llama3_2/3B_full
  enable_fp8_training=true \
  fp8_recipe_name=tensorwise \
  compile=True
初步实验显示,float8 微调 Llama3.2-3B 的吞吐量最高可提高 16.5%。
experiment_name         tok/s                 peak_mem_reserved
----------------------  -------------------   -------------------
bf16                    6502.143 (+0.000%)    30.090 (+0.000%)
fp8_noname              7205.386 (+10.816%)   30.010 (-0.266%)
fp8_tensorwise          7222.198 (+11.074%)   30.010 (-0.266%)
fp8_rowwise             6387.968 (-1.756%)    29.158 (-3.096%)
fp8_rowwise_with_gw_hp  7573.698 (+16.480%)   29.516 (-1.908%)

experiment_name         hellaswag_acc    wikitext_word_perplexity
----------------------  ---------------  --------------------------
bf16                    0.533 (+0.000)   12.407 (+0.000)
fp8_noname              0.533 (+0.000)   12.414 (+0.007)
fp8_tensorwise          0.533 (+0.000)   12.412 (+0.005)
fp8_rowwise             0.533 (-0.000)   12.420 (+0.013)
fp8_rowwise_with_gw_hp  0.534 (+0.001)   12.416 (+0.009)
有关更多详细信息,请参阅预训练教程。
