将掩码重新用于边界框
以下示例说明了 torchvision.ops 模块中可用的操作,用于将分割掩码重新用于不同任务的对象定位标注(例如,将实例分割和全景分割方法使用的掩码转换为对象检测方法使用的边界框)。
import os
import numpy as np
import torch
import matplotlib.pyplot as plt

import torchvision.transforms.functional as F


ASSETS_DIRECTORY = "../assets"

plt.rcParams["savefig.bbox"] = "tight"


def show(imgs):
    if not isinstance(imgs, list):
        imgs = [imgs]
    fix, axs = plt.subplots(ncols=len(imgs), squeeze=False)
    for i, img in enumerate(imgs):
        img = img.detach()
        img = F.to_pil_image(img)
        axs[0, i].imshow(np.asarray(img))
        axs[0, i].set(xticklabels=[], yticklabels=[], xticks=[], yticks=[])
掩码
在实例分割和全景分割等任务中,掩码通常是这样定义的,并且由本软件包定义,为一个多维数组(例如 NumPy 数组或 PyTorch 张量),其形状如下:
(num_objects, height, width)
其中 num_objects 是图像中带标注对象的数量。每个 (height, width) 对象对应一个对象。例如,如果输入图像的尺寸为 224 x 224 且有四个带标注的对象,则掩码标注的形状如下:
(4, 224, 224).
掩码的一个优点是它们可以轻松地重新用于解决各种对象定位任务的方法。
将掩码转换为边界框
例如,可以使用 masks_to_boxes() 操作将掩码转换为可作为 FasterRCNN 和 RetinaNet 等检测模型输入的边界框。我们将使用来自 PenFudan 数据集的图像和掩码。
from torchvision.io import decode_image

img_path = os.path.join(ASSETS_DIRECTORY, "FudanPed00054.png")
mask_path = os.path.join(ASSETS_DIRECTORY, "FudanPed00054_mask.png")
img = decode_image(img_path)
mask = decode_image(mask_path)
这里的掩码表示为 PNG 图像,具有浮点值。每个像素都以不同的颜色编码,0 为背景。请注意,图像和掩码的空间维度是匹配的。
torch.Size([1, 498, 533])
torch.Size([3, 498, 533])
tensor([[[0, 0, 0,  ..., 0, 0, 0],
         [0, 0, 0,  ..., 0, 0, 0],
         [0, 0, 0,  ..., 0, 0, 0],
         ...,
         [0, 0, 0,  ..., 0, 0, 0],
         [0, 0, 0,  ..., 0, 0, 0],
         [0, 0, 0,  ..., 0, 0, 0]]], dtype=torch.uint8)
# We get the unique colors, as these would be the object ids.
obj_ids = torch.unique(mask)

# first id is the background, so remove it.
obj_ids = obj_ids[1:]

# split the color-encoded mask into a set of boolean masks.
# Note that this snippet would work as well if the masks were float values instead of ints.
masks = mask == obj_ids[:, None, None]
现在掩码是一个布尔张量。在这种情况下,第一个维度为 3,表示实例的数量:图像中有 3 个人。另外两个维度是高度和宽度,它们等于图像的尺寸。对于每个实例,布尔张量表示该特定像素是否属于图像的分割掩码。
torch.Size([3, 498, 533])
tensor([[[False, False, False,  ..., False, False, False],
         [False, False, False,  ..., False, False, False],
         [False, False, False,  ..., False, False, False],
         ...,
         [False, False, False,  ..., False, False, False],
         [False, False, False,  ..., False, False, False],
         [False, False, False,  ..., False, False, False]],

        [[False, False, False,  ..., False, False, False],
         [False, False, False,  ..., False, False, False],
         [False, False, False,  ..., False, False, False],
         ...,
         [False, False, False,  ..., False, False, False],
         [False, False, False,  ..., False, False, False],
         [False, False, False,  ..., False, False, False]]])
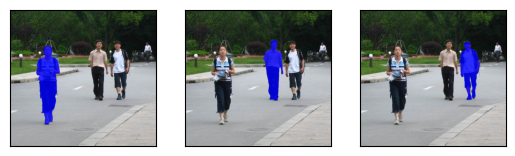
让我们可视化一张图像并绘制其对应的分割掩码。我们将使用 draw_segmentation_masks() 来绘制分割掩码。
from torchvision.utils import draw_segmentation_masks

drawn_masks = []
for mask in masks:
    drawn_masks.append(draw_segmentation_masks(img, mask, alpha=0.8, colors="blue"))

show(drawn_masks)
要将布尔掩码转换为边界框。我们将使用 torchvision.ops 模块中的 masks_to_boxes()。它以 (xmin, ymin, xmax, ymax) 格式返回边界框。
torch.Size([3, 4])
tensor([[ 96., 134., 181., 417.],
        [286., 113., 357., 331.],
        [363., 120., 436., 328.]])
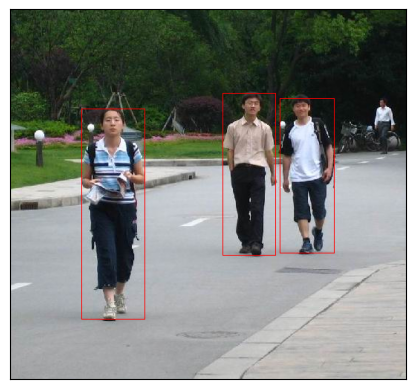
如形状所示,有 3 个边界框,格式为 (xmin, ymin, xmax, ymax)。这些可以使用 torchvision.utils 中提供的 draw_bounding_boxes() 工具轻松可视化。
from torchvision.utils import draw_bounding_boxes

drawn_boxes = draw_bounding_boxes(img, boxes, colors="red")
show(drawn_boxes)
这些边界框现在可以直接被 torchvision 中的检测模型使用。以下是一个使用从 fasterrcnn_resnet50_fpn() 加载的 Faster R-CNN 模型的演示。
from torchvision.models.detection import fasterrcnn_resnet50_fpn, FasterRCNN_ResNet50_FPN_Weights

weights = FasterRCNN_ResNet50_FPN_Weights.DEFAULT
model = fasterrcnn_resnet50_fpn(weights=weights, progress=False)
print(img.size())

transforms = weights.transforms()
img = transforms(img)
target = {}
target["boxes"] = boxes
target["labels"] = labels = torch.ones((masks.size(0),), dtype=torch.int64)
detection_outputs = model(img.unsqueeze(0), [target])
Downloading: "https://download.pytorch.org/models/fasterrcnn_resnet50_fpn_coco-258fb6c6.pth" to /root/.cache/torch/hub/checkpoints/fasterrcnn_resnet50_fpn_coco-258fb6c6.pth
torch.Size([3, 498, 533])
将分割数据集转换为检测数据集
有了这个工具,将分割数据集转换为检测数据集变得非常简单。借此,我们就可以使用分割数据集来训练检测模型。类似地,也可以将全景数据集转换为检测数据集。以下是一个将 PenFudan 检测教程的数据集重新用于此目的的示例。
class SegmentationToDetectionDataset(torch.utils.data.Dataset):
    def __init__(self, root, transforms):
        self.root = root
        self.transforms = transforms
        # load all image files, sorting them to
        # ensure that they are aligned
        self.imgs = list(sorted(os.listdir(os.path.join(root, "PNGImages"))))
        self.masks = list(sorted(os.listdir(os.path.join(root, "PedMasks"))))

    def __getitem__(self, idx):
        # load images and masks
        img_path = os.path.join(self.root, "PNGImages", self.imgs[idx])
        mask_path = os.path.join(self.root, "PedMasks", self.masks[idx])

        img = decode_image(img_path)
        mask = decode_image(mask_path)

        img = F.convert_image_dtype(img, dtype=torch.float)
        mask = F.convert_image_dtype(mask, dtype=torch.float)

        # We get the unique colors, as these would be the object ids.
        obj_ids = torch.unique(mask)

        # first id is the background, so remove it.
        obj_ids = obj_ids[1:]

        # split the color-encoded mask into a set of boolean masks.
        masks = mask == obj_ids[:, None, None]

        boxes = masks_to_boxes(masks)

        # there is only one class
        labels = torch.ones((masks.shape[0],), dtype=torch.int64)

        target = {}
        target["boxes"] = boxes
        target["labels"] = labels

        if self.transforms is not None:
            img, target = self.transforms(img, target)

        return img, target
脚本总运行时间: (0 分 2.165 秒)
