在 iOS 上使用 ExecuTorch
ExecuTorch 支持通过 Objective-C、Swift 和 C++ 在 iOS 和 macOS 上运行。ExecuTorch 还提供后端,利用 Core ML 和 Metal Performance Shaders (MPS) 在 Apple 平台上实现硬件加速执行。
集成
适用于 iOS 和 macOS (ARM64) 的 ExecuTorch Runtime 以一组预构建的 .xcframework 二进制目标的形式分发。这些目标与 iOS 和 macOS 设备及模拟器兼容,并提供发布版和调试版两种模式。
executorch- 核心运行时组件backend_coreml- Core ML 后端backend_mps- MPS 后端backend_xnnpack- XNNPACK 后端kernels_custom- LLM 的自定义内核kernels_optimized- 加速的通用 CPU 内核kernels_quantized- 量化内核
将您的二进制文件与 ExecuTorch 运行时以及导出的 ML 模型使用的任何后端或内核链接。建议将核心运行时链接到直接使用 ExecuTorch 的组件,并将内核和后端链接到主应用目标。
注意: 要访问日志,请链接 ExecuTorch 运行时的调试版本,即 executorch_debug 框架。为获得最佳性能,请始终链接交付物的发布版本(不带 _debug 后缀的版本),其中所有日志开销都已移除。
Swift 包管理器
预构建的 ExecuTorch 运行时、后端和内核可作为 Swift PM 包提供。
Xcode
在 Xcode 中,转到 File > Add Package Dependencies。将 ExecuTorch 仓库 的 URL 粘贴到搜索栏并选中它。请确保将分支名称更改为您想要的 ExecuTorch 版本,格式为“swiftpm-

然后选择哪个 ExecuTorch 框架应该链接到哪个目标。
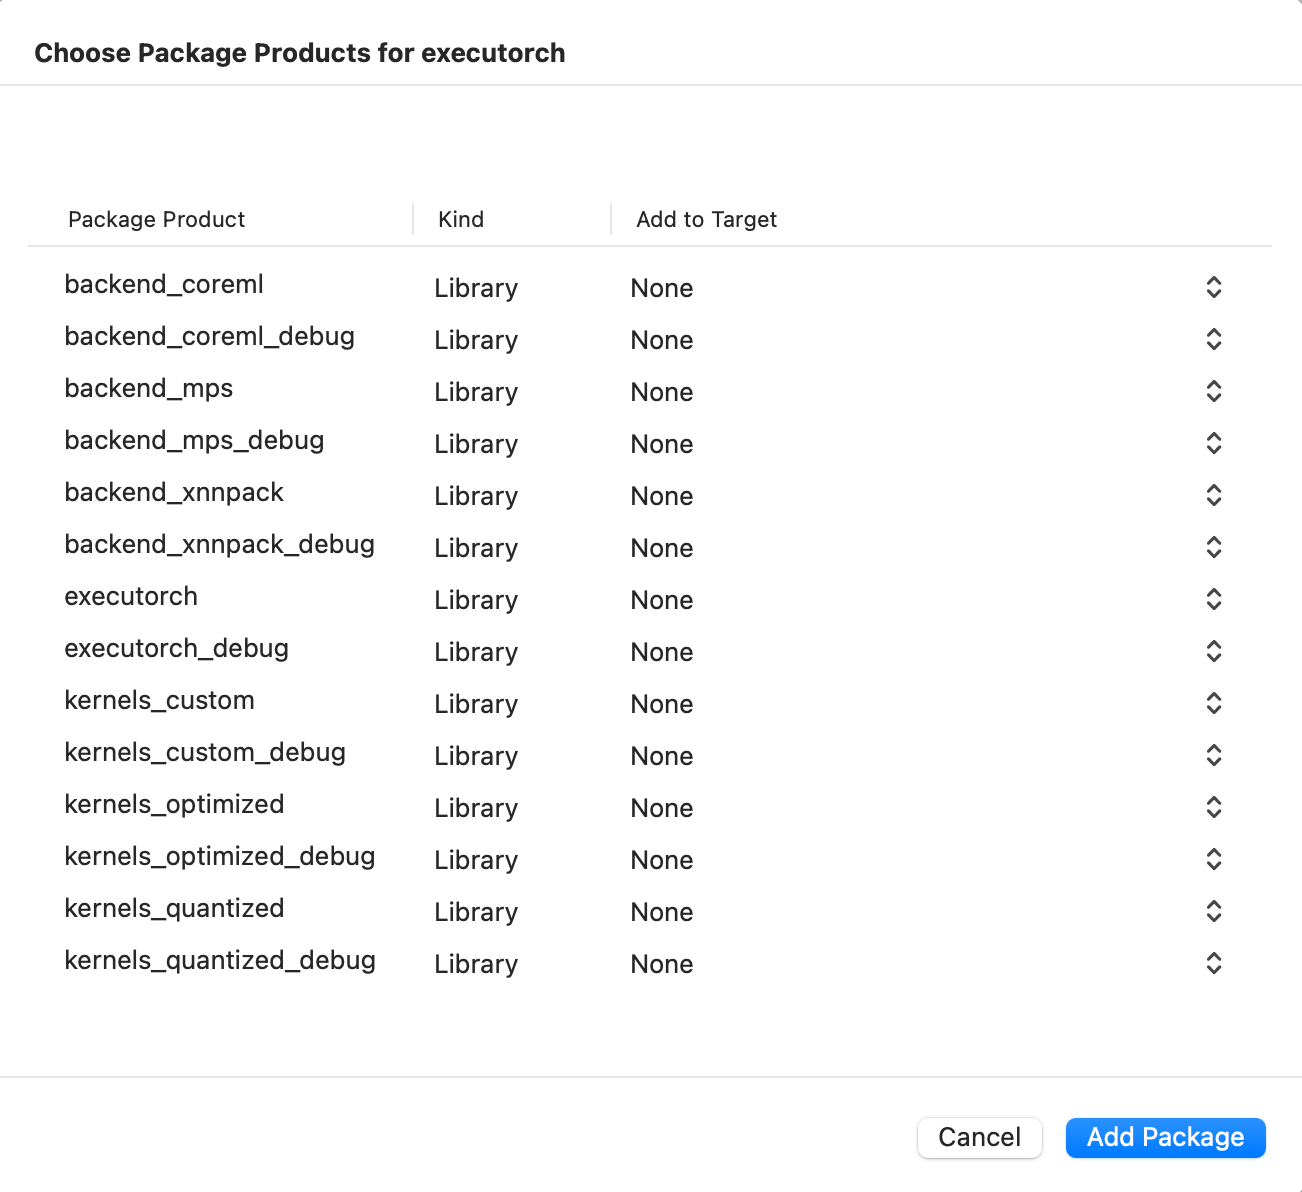
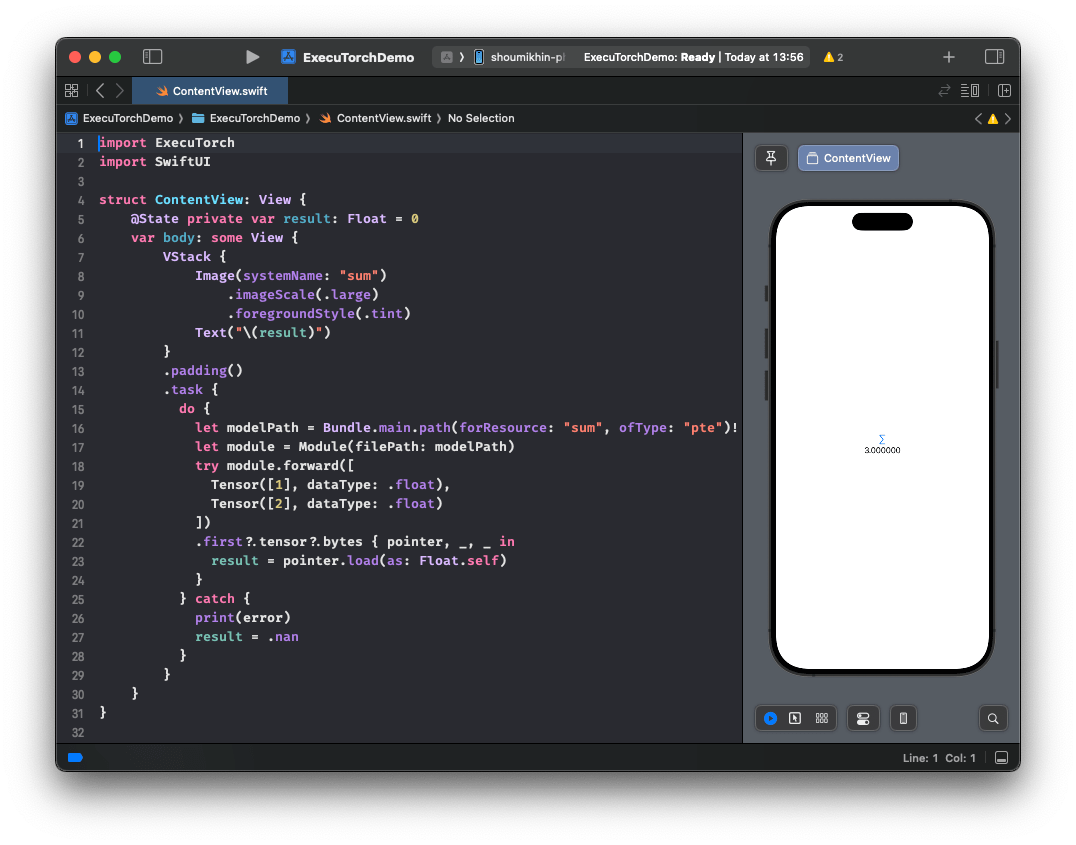
点击下方截图观看演示视频,了解如何添加包并在 iOS 上运行简单的 ExecuTorch 模型。
CLI
将 ExecuTorch 的包和目标依赖项添加到您的包文件,如下所示:
// swift-tools-version:5.9
import PackageDescription

let package = Package(
  name: "YourPackageName",
  platforms: [
    .iOS(.v17),
    .macOS(.v12),
  ],
  products: [
    .library(name: "YourPackageName", targets: ["YourTargetName"]),
  ],
  dependencies: [
    // Use "swiftpm-<version>.<year_month_day>" branch name for a nightly build.
    .package(url: "https://github.com/pytorch/executorch.git", branch: "swiftpm-0.7.0")
  ],
  targets: [
    .target(
      name: "YourTargetName",
      dependencies: [
        .product(name: "executorch", package: "executorch"),
        .product(name: "backend_xnnpack", package: "executorch"),
        .product(name: "kernels_optimized", package: "executorch"),
        // Add other backends and kernels as needed.
      ]),
  ]
)
然后检查一切是否正常工作:
cd path/to/your/package

swift package resolve

# or just build it
swift build
从源代码构建
另一种集成 ExecuTorch 运行时的方法是从本地源代码构建必要的组件并与之链接。当需要自定义运行时时,此方法很有用。
安装 Xcode 15+ 和命令行工具
xcode-select --install
克隆 ExecuTorch
git clone -b release/0.7 https://github.com/pytorch/executorch.git --depth 1 --recurse-submodules --shallow-submodules && cd executorch
设置 Python 3.10+ 并激活虚拟环境
python3 -m venv .venv && source .venv/bin/activate && pip install --upgrade pip
./install_requirements.sh

# CoreML-only requirements:
./backends/apple/coreml/scripts/install_requirements.sh
安装 CMake
从 CMake 网站 下载 macOS 二进制发行版,打开 .dmg 文件,将 CMake.app 移动到 /Applications 目录,然后运行以下命令安装 CMake 命令行工具:
sudo /Applications/CMake.app/Contents/bin/cmake-gui --install
使用提供的脚本构建 .xcframeworks
以下命令将在发布和调试模式下为 Apple 平台构建 ExecuTorch 运行时组件以及所有可用的内核和后端:
./scripts/build_apple_frameworks.sh
构建成功完成后,生成的框架可以在 cmake-out 目录中找到。将它们复制到您的项目中并链接到您的目标。
链接
ExecuTorch 在应用启动期间通过在静态字典中注册来初始化其后端和内核(运算符)。如果您在运行时遇到“未注册内核”或“未注册后端”之类的错误,您可能需要显式强制加载某些组件。在 Xcode 构建配置中使用 -all_load 或 -force_load 链接器标志,以确保组件能够尽早注册。
以下是一个 Xcode 配置文件 (.xcconfig) 的示例:
ET_PLATFORM[sdk=iphonesimulator*] = simulator
ET_PLATFORM[sdk=iphoneos*] = ios
ET_PLATFORM[sdk=macos*] = macos

OTHER_LDFLAGS = $(inherited) \
    -force_load $(BUILT_PRODUCTS_DIR)/libexecutorch_debug_$(ET_PLATFORM).a \
    -force_load $(BUILT_PRODUCTS_DIR)/libbackend_coreml_$(ET_PLATFORM).a \
    -force_load $(BUILT_PRODUCTS_DIR)/libbackend_mps_$(ET_PLATFORM).a \
    -force_load $(BUILT_PRODUCTS_DIR)/libbackend_xnnpack_$(ET_PLATFORM).a \
    -force_load $(BUILT_PRODUCTS_DIR)/libkernels_optimized_$(ET_PLATFORM).a \
    -force_load $(BUILT_PRODUCTS_DIR)/libkernels_quantized_$(ET_PLATFORM).a
注意: 在上面的示例中,我们链接到 ExecuTorch 运行时的调试版本 (libexecutorch_debug) 以保留日志。通常,这不会对性能产生太大影响。尽管如此,请记住链接到发布版本的运行时 (libexecutorch) 以获得最佳性能且无日志。
您可以将此类配置文件分配给 Xcode 中的目标。
将
.xcconfig文件添加到您的项目中。导航到项目的 Info 选项卡。
在发布(或调试)模式的构建配置中选择配置文件。
运行时 API
ExecuTorch 提供原生的 Objective-C API,并自动桥接到 Swift,用于与运行时进行交互。这些 API 是 extension/tensor 和 extension/module 中核心 C++ 组件的包装器,为 Apple 平台开发者提供了更地道的体验。
注意: 这些 Objective-C/Swift API 目前处于实验阶段,可能会发生变化。
导入
链接到 executorch 框架后,您可以导入必要的组件。
Objective-C (Objective-C++)
// Import the main umbrella header for Module/Tensor/Value wrappers.
#import <ExecuTorch/ExecuTorch.h>

// If using C++ directly alongside Objective-C++, you might still need C++ headers.
#import <executorch/extension/module/module.h>
#import <executorch/extension/tensor/tensor.h>
Swift
import ExecuTorch
示例
这是一个简洁的示例,演示如何使用 Objective-C 和 Swift API 加载模型、准备输入、运行推理和处理输出。假设您有一个 MobileNet v3 模型 (mv3.pte),该模型接受 [1, 3, 224, 224] 的浮点张量作为输入并输出 logits。
Objective-C
NSString *modelPath = [[NSBundle mainBundle] pathForResource:@"mv3" ofType:@"pte"];

// Create a module with the model file path. Nothing gets loaded into memory just yet.
ExecuTorchModule *module = [[ExecuTorchModule alloc] initWithFilePath:modelPath];

NSError *error;  // Optional error output argument to learn about failures.

// Force-load the program and 'forward' method. Otherwise, it's loaded at the first execution.
[module loadMethod:@"forward" error:&error];

float *imageBuffer = ...;  // Existing image buffer.

// Create an input tensor referencing the buffer and assuming the given shape and data type.
ExecuTorchTensor *inputTensor = [[ExecuTorchTensor alloc] initWithBytesNoCopy:imageBuffer
                                                                        shape:@[@1, @3, @224, @224]
                                                                     dataType:ExecuTorchDataTypeFloat];

// Execute the 'forward' method with the given input tensor and get output values back.
NSArray<ExecuTorchValue *> *outputs = [module forwardWithTensor:inputTensor error:&error];

// Get the first output value assuming it's a tensor.
ExecuTorchTensor *outputTensor = outputs.firstObject.tensorValue;

// Access the output tensor data.
[outputTensor bytesWithHandler:^(const void *pointer, NSInteger count, ExecuTorchDataType dataType) {
  float *logits = (float *)pointer;
  // Use logits...
}];
Swift
let modelPath = Bundle.main.path(forResource: "mv3", ofType: "pte")!

// Create a module with the model file path. Nothing gets loaded into memory just yet.
let module = Module(filePath: modelPath)

// Force-load the program and 'forward' method. Otherwise, it's loaded at the first execution.
try module.load("forward")

let imageBuffer: UnsafeMutableRawPointer = ... // Existing image buffer

// Create an input tensor referencing the buffer and assuming the given shape and data type.
let inputTensor = Tensor<Float>(&imageBuffer, shape: [1, 3, 224, 224])

// Execute the 'forward' method with the given input tensor and get an output tensor back.
let outputTensor: Tensor<Float> = try module.forward(inputTensor)[0].tensor()!

// Copy the tensor data into logits array for easier access.
let logits = try outputTensor.scalars()

// Use logits...
张量
张量是元素的(如浮点数或整数)多维数组,包含像形状(维度)和数据类型这样的元数据。张量用于将输入馈送到模型和检索输出,或用于您需要对原始数据进行的任何计算。您可以从简单的数字数组创建张量,检查它们的属性,读取或修改它们的内容,甚至重塑或复制它们。
ExecuTorch 在 Objective-C 中提供 ExecuTorchTensor 类,在 Swift 中提供两种张量类型:
AnyTensor:一个类型擦除的张量,从 Objective-C 中的ExecuTorchTensor桥接而来。当张量的数据类型仅在运行时可知时,您可能会使用它,例如,在从无类型的Value对象转换并将其强制转换为泛型Tensor<T>之前。Tensor<T: Scalar>:一个泛型的、类型安全的AnyTensor包装器。这是 Swift 中大多数用例推荐的类型。它确保元素类型(例如Float、Int)在编译时已知,提供类型安全的张量数据访问,并及早捕获类型不匹配。
您可以使用 tensor.anyTensor(获取底层 AnyTensor)和 anyTensor.asTensor()(如果数据类型匹配,则转换为类型化的 Tensor<T>)在它们之间进行转换。
关键属性:
dataType:元素类型(例如.float、.int、.byte)。在Tensor<T>中,这由T决定。shape:一个Int数组,描述每个维度的尺寸。count:元素的总数。strides:在内存中前进每个维度一个元素所需的步长。dimensionOrder:内存中维度的顺序。shapeDynamism:指示张量形状是否可以更改(.static、.dynamicBound、.dynamicUnbound)。
初始化:
您可以从现有张量创建新张量,无论是作为视图(共享相同底层数据)还是作为副本(拥有自己的唯一数据)。
视图:
init(_:)创建一个指向与原始张量相同内存的新张量实例。通过一个张量修改数据会影响另一个。副本:
copy()创建张量的完全独立副本,包括其自身的数据副本。
Objective-C
// Create a view.
ExecuTorchTensor *tensorView = [[ExecuTorchTensor alloc] initWithTensor:originalTensor];

// Create a copy.
ExecuTorchTensor *tensorCopy = [originalTensor copy];
Swift
// Create a view.
let tensorView = Tensor(originalTensor)

// Create a copy.
let tensorCopy = originalTensor.copy()
张量可以直接从内存指针或 Data 对象初始化。
init(bytesNoCopy:...):创建一个引用现有内存缓冲区而不进行复制的张量。缓冲区的生命周期必须手动管理,并且必须超过张量的生命周期。init(bytes:...):通过复制内存缓冲区中的数据来创建张量。init(data:...):使用NSData(Objective-C) 或Data(Swift) 对象创建张量,引用其字节而不进行复制。
Objective-C
// Create by copying bytes.
float data[] = {1.0f, 2.0f, 3.0f, 4.0f};
NSArray<NSNumber *> *shape = @[@2, @2];
ExecuTorchTensor *tensorFromBytes = [[ExecuTorchTensor alloc] initWithBytes:data
                                                                      shape:shape
                                                                   dataType:ExecuTorchDataTypeFloat];

// Create from NSData (no copy).
NSData *nsData = [NSData dataWithBytes:data length:sizeof(data)];
ExecuTorchTensor *tensorFromNSData = [[ExecuTorchTensor alloc] initWithData:nsData
                                                                      shape:shape
                                                                   dataType:ExecuTorchDataTypeFloat];
Swift
// Create from a buffer without copying (unsafe).
var mutableData: [Float] = [1.0, 2.0, 3.0, 4.0]
let tensorNoCopy = mutableData.withUnsafeMutableBytes { pointer in
  Tensor<Float>(
    bytesNoCopy: pointer.baseAddress!,
    shape: [2, 2]
  )
}

// Create from Data (no copy).
let data = Data(bytes: &mutableData, count: mutableData.count * MemoryLayout<Float>.size)
let tensorFromData = Tensor<Float>(data: data, shape: [2, 2])
创建张量最方便的方法是直接从 Swift 数组或单个标量值创建。 Tensor<T> API 使用类型推断自动确定 dataType。
objective-c
// Create from an array of scalars.
NSArray<NSNumber *> *scalars = @[@(1), @(2), @(3)];
NSArray<NSNumber *> *shape = @[@3];
ExecuTorchTensor *tensorFromScalars = [[ExecuTorchTensor alloc] initWithScalars:scalars
                                                                          shape:shape
                                                                       dataType:ExecuTorchDataTypeInt];

// Create a float scalar tensor.
ExecuTorchTensor *scalarTensor = [[ExecuTorchTensor alloc] initWithFloat:3.14f];
Swift
// Create from an array of scalars (infers shape and copies data).
let tensor = Tensor([1.0, 2.0, 3.0, 4.0]) // Creates a Tensor<Double> with shape [4]

// Specify shape.
let tensorWithShape = Tensor([1, 2, 3, 4, 5, 6], shape: [2, 3]) // Creates Tensor<Int>

// Create without copying from an `inout` array.
var liveData: [Int32] = [10, 20, 30]
let tensorNoCopy = Tensor(&liveData) // Modifying `liveData` affects `tensorNoCopy`

// Create an Int scalar tensor.
let scalarTensor = Tensor(42) // Infers Tensor<Int> with shape []
工厂方法:
ExecuTorch 提供了一套丰富的工厂方法来创建填充了预设值或随机数据的张量。
empty:创建一个数据未初始化的张量。full:创建一个填充了指定标量值的张量。ones:创建一个填充了 1 的张量。zeros:创建一个填充了 0 的张量。rand:创建一个在[0, 1)范围内均匀分布的随机值的张量。randn:创建一个来自正态分布(均值 0,方差 1)的随机值的张量。randint:在指定范围[low, high)内创建随机整数的张量。
每个方法都有一个 like: 变体,它创建一个具有与现有张量相同形状和属性的新张量。
Objective-C
// Create a 2x2 tensor filled with zeros.
ExecuTorchTensor *zeros = [ExecuTorchTensor zerosTensorWithShape:@[@2, @2]
                                                        dataType:ExecuTorchDataTypeFloat];

// Create a tensor of ones with the same shape as `zeros`.
ExecuTorchTensor *ones = [ExecuTorchTensor onesTensorLikeTensor:zeros];
Swift
// Create a 2x2 tensor filled with the value 7.
let fullTensor = Tensor<Int32>.full(shape: [2, 2], scalar: 7)

// Create a 3x3 tensor of ones.
let onesTensor = Tensor<Float>.ones(shape: [3, 3])

// Create a tensor of zeros with the same shape as onesTensor.
let zerosTensor = Tensor<Float>.zeros(like: onesTensor)

// Create a tensor with random integers between 10 (inclusive) and 20 (exclusive).
let randomInts = Tensor<Int>.randint(low: 10, high: 20, shape: [5])

// Create a 2x2 type-erased tensor filled with zeros and explicit data type.
let anyZeros = AnyTensor.zeros(shape: [2, 2], dataType: .float)

// Create a 2x3 type-erased tensor filled with random values and explicit data type.
let anyRand = AnyTensor.rand(shape: [2, 3], dataType: .double)
访问数据:
读取数据
scalars():将张量的元素作为新[T]数组返回副本。withUnsafeBytes(_:):提供类型安全、不可变的缓冲区指针(UnsafeBufferPointer<T>),用于高效、直接的内存访问,而无需创建新数组。bytesWithHandler::Objective-C 和AnyTensor的方法,它使用带有原始void *指针的回调,并需要手动进行类型转换。
Objective-C
[tensor bytesWithHandler:^(const void *pointer, NSInteger count, ExecuTorchDataType dataType) {
  if (dataType == ExecuTorchDataTypeFloat) {
    const float *floatPointer = (const float *)pointer;
    NSLog(@"First float element: %f", floatPointer[0]);
  }
}];
Swift
let tensor = Tensor<Float>([1.0, 2.0, 3.0, 4.0], shape: [2, 2])

// Get data copy as a Swift array.
let scalars = try tensor.scalars()
print("All scalars: \(scalars)") // [1.0, 2.0, 3.0, 4.0]

// Access data via a buffer pointer.
try tensor.withUnsafeBytes { buffer in
  print("First float element: \(buffer.first ?? 0.0)")
}

anyTensor.bytes { pointer, count, dataType in
  // Must check data type and manually cast the pointer for type-erased tensor.
  if dataType == .float {
    let buffer = UnsafeBufferPointer(start: pointer.assumingMemoryBound(to: Float.self), count: count)
    print("First float element from AnyTensor: \(buffer.first ?? 0.0)")
  }
}
修改数据
withUnsafeMutableBytes(_:):首选的 Swift 方法。提供类型安全、可变的缓冲区指针(UnsafeMutableBufferPointer<T>),用于就地修改。mutableBytesWithHandler::Objective-C 和AnyTensor的等效方法。
Objective-C
[tensor mutableBytesWithHandler:^(void *pointer, NSInteger count, ExecuTorchDataType dataType) {
  if (dataType == ExecuTorchDataTypeFloat) {
    float *floatPointer = (float *)pointer;
    floatPointer[0] = 100.0f; // Modify the tensor's data.
  }
}];
Swift
let tensor = Tensor<Float>([1.0, 2.0, 3.0, 4.0], shape: [2, 2])

// Modify the tensor's data in place.
try tensor.withUnsafeMutableBytes { buffer in
  buffer[1] = 200.0
}
// tensor's data is now [1.0, 200.0, 3.0, 4.0]

anyTensor.mutableBytes { pointer, count, dataType in
  if dataType == .float {
    let buffer = UnsafeMutableBufferPointer(start: pointer.assumingMemoryBound(to: Float.self), count: count)
    buffer[0] = 100.0 // Modify the AnyTensor's data
  }
}
调整大小:
如果张量的形状动态性不是 .static,则可以调整张量的大小。调整大小仅更改张量的元数据(形状和步幅),不会重新分配或更改底层数据,因此新形状必须具有相同的元素总数。
Objective-C
NSError *error;
BOOL success = [tensor resizeToShape:@[@4, @1] error:&error];
if (success) {
  NSLog(@"Resized shape: %@", tensor.shape);
} else {
  NSLog(@"Resize failed: %@", error);
}
Swift
do {
  try tensor.resize(to: [4, 1])
  print("Resized shape: \(tensor.shape)")
} catch {
  print("Resize failed: \(error)")
}
相等性:
您可以使用 == 运算符检查两个张量是否相等。它比较它们的数据类型、形状、步幅、维度顺序以及所有底层元素数据。在此比较中会忽略 shapeDynamism 属性。
打印:
张量在 Swift 中符合 CustomStringConvertible,并在 Objective-C 中实现 -description,因此您可以直接将它们打印到控制台以便于调试。
值
Value 类(在 Objective-C 中公开为 ExecuTorchValue)是一个动态容器,可以保存不同类型的数据,主要用于模型输入和输出。ExecuTorch 方法接受并返回 Value 对象的数组。
关键属性:
tag:指示所保存数据的类型(例如.tensor、.integer、.string、.boolean)。isTensor、isInteger、isString等:布尔值类型检查。tensor、integer、string、boolean、double:底层数据的访问器(如果 tag 不匹配,则返回nil或默认值)。
初始化:
直接从要保存的数据创建 Value 对象。
Objective-C
#import <ExecuTorch/ExecuTorch.h>

ExecuTorchTensor *tensor = [[ExecuTorchTensor alloc] initWithFloat:1.0f];

ExecuTorchValue *tensorValue = [[ExecuTorchValue alloc] valueWithTensor:tensor];
ExecuTorchValue *intValue = [[ExecuTorchValue alloc] valueWithInteger:100];
ExecuTorchValue *stringValue = [[ExecuTorchValue alloc] valueWithString:@"hello"];
ExecuTorchValue *boolValue = [[ExecuTorchValue alloc] valueWithBoolean:YES];
ExecuTorchValue *doubleValue = [[ExecuTorchValue alloc] valueWithDouble:3.14];
Swift
import ExecuTorch

let tensor = Tensor(2.0)

let tensorValue = Value(tensor)
let intValue = Value(200)
let stringValue = Value("world")
let boolValue = Value(false)
let doubleValue = Value(2.718)
此外,在 Swift 中,Value 可以保存的所有类型都符合 ValueConvertible 协议,因此您可以直接从它们创建 Value 对象,而无需显式地将它们包装在 Value 构造器中。
func processValue(_ value: ValueConvertible) {
  // ...
}

processValue(1) // Value<Int>
processValue(1.0) // Value<Double>
processValue("hello") // Value<String>
processValue(true) // Value<Bool>
processValue(Tensor(1.0)) // Value<Tensor>
模块
Module 类(在 Objective-C 中公开为 ExecuTorchModule)代表一个已加载的 ExecuTorch 模型(.pte 文件)。它提供了加载模型程序、检查其方法以及执行它们进行推理的方法。
注意:Module 及其方法不是线程安全的。如果您需要从多个线程进行并发推理,请为每个线程创建一个 Module。
初始化:
通过提供 .pte 模型的文件路径来创建 Module 实例。初始化本身是轻量级的,并且不会立即加载程序数据。您还可以指定 ModuleLoadMode 来控制文件的加载方式,例如使用内存映射以提高效率。
Objective-C
#import <ExecuTorch/ExecuTorch.h>

NSString *modelPath = [[NSBundle mainBundle] pathForResource:@"model" ofType:@"pte"];
ExecuTorchModule *module = [[ExecuTorchModule alloc] initWithFilePath:modelPath];

// Optional: specify load mode, e.g., memory mapping.
ExecuTorchModule *moduleMmap = [[ExecuTorchModule alloc] initWithFilePath:modelPath
                                                                 loadMode:ExecuTorchModuleLoadModeMmap];
Swift
import ExecuTorch

let modelPath = Bundle.main.path(forResource: "model", ofType: "pte")!
let module = Module(filePath: modelPath)

// Optional: specify load mode, e.g., memory mapping.
let moduleMmap = Module(filePath: modelPath, loadMode: .mmap)
加载:
模型加载被推迟,直到显式请求或需要时。您可以加载整个程序或单个方法。虽然执行调用可以自动触发加载,但通常预先显式加载方法更有效。
load():加载基本的程序结构。您可以指定ModuleVerification级别,尽管默认情况下使用最少的验证。load(_:):加载程序结构并准备一个特定方法(例如,“forward”)以供执行。这将执行必要的设置,如后端委托,如果您知道将运行哪个方法,建议使用此方法。isLoaded()/isLoaded(_:):检查加载状态。
Objective-C
NSError *error;
// Loads program and prepares 'forward' for execution.
BOOL success = [module loadMethod:@"forward" error:&error];
if (success) {
  NSLog(@"Forward method loaded: %d", [module isMethodLoaded:@"forward"]);
} else {
  NSLog(@"Failed to load method: %@", error);
}
Swift
do {
  // Loads program and prepares 'forward' for execution.
  try module.load("forward")
  print("Forward method loaded: \(module.isLoaded("forward"))")
} catch {
  print("Failed to load method: \(error)")
}
检查方法元数据
您可以通过检索方法的 MethodMetadata 来以编程方式检查方法的契约——其输入/输出类型、张量形状、数据类型等。这对于构建可以适应不同模型而无需硬编码维度的动态应用程序非常有用。
Objective-c
NSError *error;
ExecuTorchMethodMetadata *metadata = [module methodMetadata:@"forward" error:&error];

if (metadata) {
  // Check if the first input is a tensor.
  ExecuTorchValueTag firstInputTag = [metadata.inputValueTags[0] unsignedIntValue];
  if (firstInputTag == ExecuTorchValueTagTensor) {
    // Get the metadata for the first input tensor.
    ExecuTorchTensorMetadata *tensorMeta = metadata.inputTensorMetadata[@0];
    if (tensorMeta) {
      NSLog(@"Expected input shape: %@", tensorMeta.shape);
      NSLog(@"Expected input data type: %ld", (long)tensorMeta.dataType);
      // You can now dynamically create a matching input tensor.
    }
  }
}
Swift
do {
  // Easily inspect the "forward" method at runtime.
  let metadata = try module.methodMetadata("forward")

  // Check if the first input is a tensor and get its metadata.
  if metadata.inputValueTags.first == .tensor,
    let tensorMeta = metadata.inputTensorMetadata[0] {

    print("Expected input shape: \(tensorMeta.shape)")
    print("Expected input data type: \(tensorMeta.dataType)")

    // Dynamically create a random tensor that matches the model's input specs.
    let input = AnyTensor.rand(shape: tensorMeta.shape, dataType: tensorMeta.dataType)

    // Use the dynamically created tensor for inference.
    let outputs = try module.forward(input)
    print("Successfully ran inference with dynamic input.")
  }
} catch {
  print("Failed to get metadata or run inference: \(error)")
}
执行:
Module 类提供了灵活的方法来执行方法。输入可以是任何符合 ValueConvertible 协议的类型(例如 Tensor、Int、Float、Bool 等)。
execute(_:_:):通过名称和零个或多个输入执行任何可用方法。forward(_:):执行常见的“forward”方法的便捷快捷方式。
该 API 为单个输入、多个输入或无输入提供了重载。输出始终作为 Value 的数组返回。
Objective-C
ExecuTorchTensor *inputTensor1 = [[ExecuTorchTensor alloc] initWithScalars:@[@1.0f, @2.0f]];
ExecuTorchTensor *inputTensor2 = [[ExecuTorchTensor alloc] initWithScalars:@[@3.0f, @4.0f]];
ExecuTorchTensor *singleInputTensor = [[ExecuTorchTensor alloc] initWithFloat:5.0f];
NSError *error;

// Execute "forward" using the shortcut with an array of Tensors.
NSArray<ExecuTorchValue *> *outputs1 = [module forwardWithTensors:@[inputTensor1, inputTensor2] error:&error];
if (outputs1) {
  NSLog(@"Forward output count: %lu", (unsigned long)outputs1.count);
} else {
  NSLog(@"Execution failed: %@", error);
}

// Execute "forward" with a single Tensor input.
NSArray<ExecuTorchValue *> *outputs2 = [module forwardWithTensor:singleInputTensor error:&error];
if (outputs2) {
  NSLog(@"Forward single input output count: %lu", (unsigned long)outputs2.count);
} else {
  NSLog(@"Execution failed: %@", error);
}

// Execute a potentially different method by name.
NSArray<ExecuTorchValue *> *outputs3 = [module executeMethod:@"another_method"
                                                   withInput:[[ExecuTorchValue alloc] valueWithTensor:inputTensor1]
                                                       error:&error];

// Process outputs (assuming first output is a tensor).
if (outputs1) {
  ExecuTorchValue *firstOutput = outputs1.firstObject;
  if (firstOutput.isTensor) {
    ExecuTorchTensor *resultTensor = firstOutput.tensorValue;
    // Process resultTensor.
  }
}
Swift
let inputTensor1 = Tensor<Float>([1.0, 2.0])
let inputTensor2 = Tensor<Float>([3.0, 4.0])
let singleInputTensor = Tensor<Float>([5.0])

do {
  // Execute "forward" using the shortcut with an array of Tensors.
  let outputs1 = try module.forward([inputTensor1, inputTensor2])
  print("Forward output count: \(outputs1.count)")

  // Execute "forward" with a single Tensor input.
  let outputs2 = try module.forward(singleInputTensor)
  print("Forward single input output count: \(outputs2.count)")

  // Execute a potentially different method by name.
  let outputs3 = try module.execute("another_method", [inputTensor1])

  // Process outputs by converting the first output Value to a typed Tensor<Float>.
  if let outputTensor: Tensor<Float> = outputs1.first?.tensor() {
    // Now you have a type-safe tensor and can access its data easily.
    let logits = try outputTensor.scalars()
    print("First 5 logits: \(logits.prefix(5))")
  }
} catch {
  print("Execution failed: \(error)")
}
方法名称:
程序加载后,您可以查询模型中可用的方法名称。
Objective-C
NSError *error;

// Note: methodNames: will load the program if not already loaded.
NSSet<NSString *> *names = [module methodNames:&error];
if (names) {
  NSLog(@"Available methods: %@", names);
} else {
  NSLog(@"Could not get method names: %@", error);
}
Swift
do {
  // Note: methodNames() will load the program if not already loaded.
  let names = try module.methodNames()
  print("Available methods: \(names)") // Output: e.g., {"forward"}
} catch {
  print("Could not get method names: \(error)")
}
日志记录
ExecuTorch 通过 ExecuTorchLog(Swift 中的 Log)单例提供 Objective-C 和 Swift 的日志记录 API。您可以订阅符合 ExecuTorchLogSink(Swift 中的 LogSink)协议的自定义日志接收器,以接收内部 ExecuTorch 日志消息。
注意: 在 ExecuTorch 框架的发布构建中,日志会被剥离。要捕获日志,请在开发过程中链接到调试构建(例如 executorch_debug)。
Objective-C
#import <ExecuTorch/ExecuTorch.h>
#import <os/log.h>

@interface MyClass : NSObject<ExecuTorchLogSink>
@end

@implementation MyClass

- (instancetype)init {
  self = [super init];
  if (self) {
#if DEBUG
    [ExecuTorchLog.sharedLog addSink:self];
#endif
  }
  return self;
}

- (void)dealloc {
#if DEBUG
  [ExecuTorchLog.sharedLog removeSink:self];
#endif
}

#if DEBUG
- (void)logWithLevel:(ExecuTorchLogLevel)level
           timestamp:(NSTimeInterval)timestamp
            filename:(NSString *)filename
                line:(NSUInteger)line
             message:(NSString *)message {
  NSString *logMessage = [NSString stringWithFormat:@"%@:%lu %@", filename, (unsigned long)line, message];
  switch (level) {
    case ExecuTorchLogLevelDebug:
      os_log_with_type(OS_LOG_DEFAULT, OS_LOG_TYPE_DEBUG, "%{public}@", logMessage);
      break;
    case ExecuTorchLogLevelInfo:
      os_log_with_type(OS_LOG_DEFAULT, OS_LOG_TYPE_INFO, "%{public}@", logMessage);
      break;
    case ExecuTorchLogLevelError:
      os_log_with_type(OS_LOG_DEFAULT, OS_LOG_TYPE_ERROR, "%{public}@", logMessage);
      break;
    case ExecuTorchLogLevelFatal:
      os_log_with_type(OS_LOG_DEFAULT, OS_LOG_TYPE_FAULT, "%{public}@", logMessage);
      break;
    default:
      os_log(OS_LOG_DEFAULT, "%{public}@", logMessage);
      break;
  }
}
#endif

@end
Swift
import ExecuTorch
import os.log

public class MyClass {
  public init() {
    #if DEBUG
    Log.shared.add(sink: self)
    #endif
  }
  deinit {
    #if DEBUG
    Log.shared.remove(sink: self)
    #endif
  }
}

#if DEBUG
extension MyClass: LogSink {
  public func log(level: LogLevel, timestamp: TimeInterval, filename: String, line: UInt, message: String) {
    let logMessage = "\(filename):\(line) \(message)"
    switch level {
    case .debug:
      os_log(.debug, "%{public}@", logMessage)
    case .info:
      os_log(.info, "%{public}@", logMessage)
    case .error:
      os_log(.error, "%{public}@", logMessage)
    case .fatal:
      os_log(.fault, "%{public}@", logMessage)
    default:
      os_log("%{public}@", logMessage)
    }
  }
}
#endif
注意: 在示例中,当代码未为调试模式构建时(即 DEBUG 宏未定义或等于零),日志会被故意剥离。
调试
如果您链接到 ExecuTorch 框架的调试版本,请通过在调试会话中使用以下 LLDB 命令来配置您的调试器以正确映射源代码:
settings append target.source-map /executorch <path_to_executorch_source_code>
故障排除
执行缓慢
确保导出的模型使用了适当的后端,例如 XNNPACK、Core ML 或 MPS。如果正确调用了后端但性能问题仍然存在,请确认您链接的是后端运行时的发布版本。
为获得最佳性能,请同样以发布模式链接 ExecuTorch 运行时。如果需要调试,您可以将 ExecuTorch 运行时保留在调试模式,对性能的影响极小,但可以保留日志记录和调试符号。
Swift PM
如果您遇到 Swift PM 的校验和不匹配错误,请使用 Xcode 菜单(File > Packages > Reset Package Caches)或以下命令清除包缓存:
rm -rf <YouProjectName>.xcodeproj/project.xcworkspace/xcshareddata/swiftpm \
  ~/Library/org.swift.swiftpm \
  ~/Library/Caches/org.swift.swiftpm \
  ~/Library/Caches/com.apple.dt.Xcode \
  ~/Library/Developer/Xcode/DerivedData
注意: 在运行终端命令之前,请确保 Xcode 已完全退出,以避免与活动进程发生冲突。
